Getting started
The dashboard
/dashboardThe dashboard is the first screen you see after signing in, and it is the home base you return to from anywhere in Ida OS. What it shows depends on who you are: studio staff see an operational overview of the whole school, while families see a personal summary of their own students and account.
You never need to configure the dashboard — it assembles itself from your live data and updates as families enrol, classes fill, and payments come in.
If you run the studio
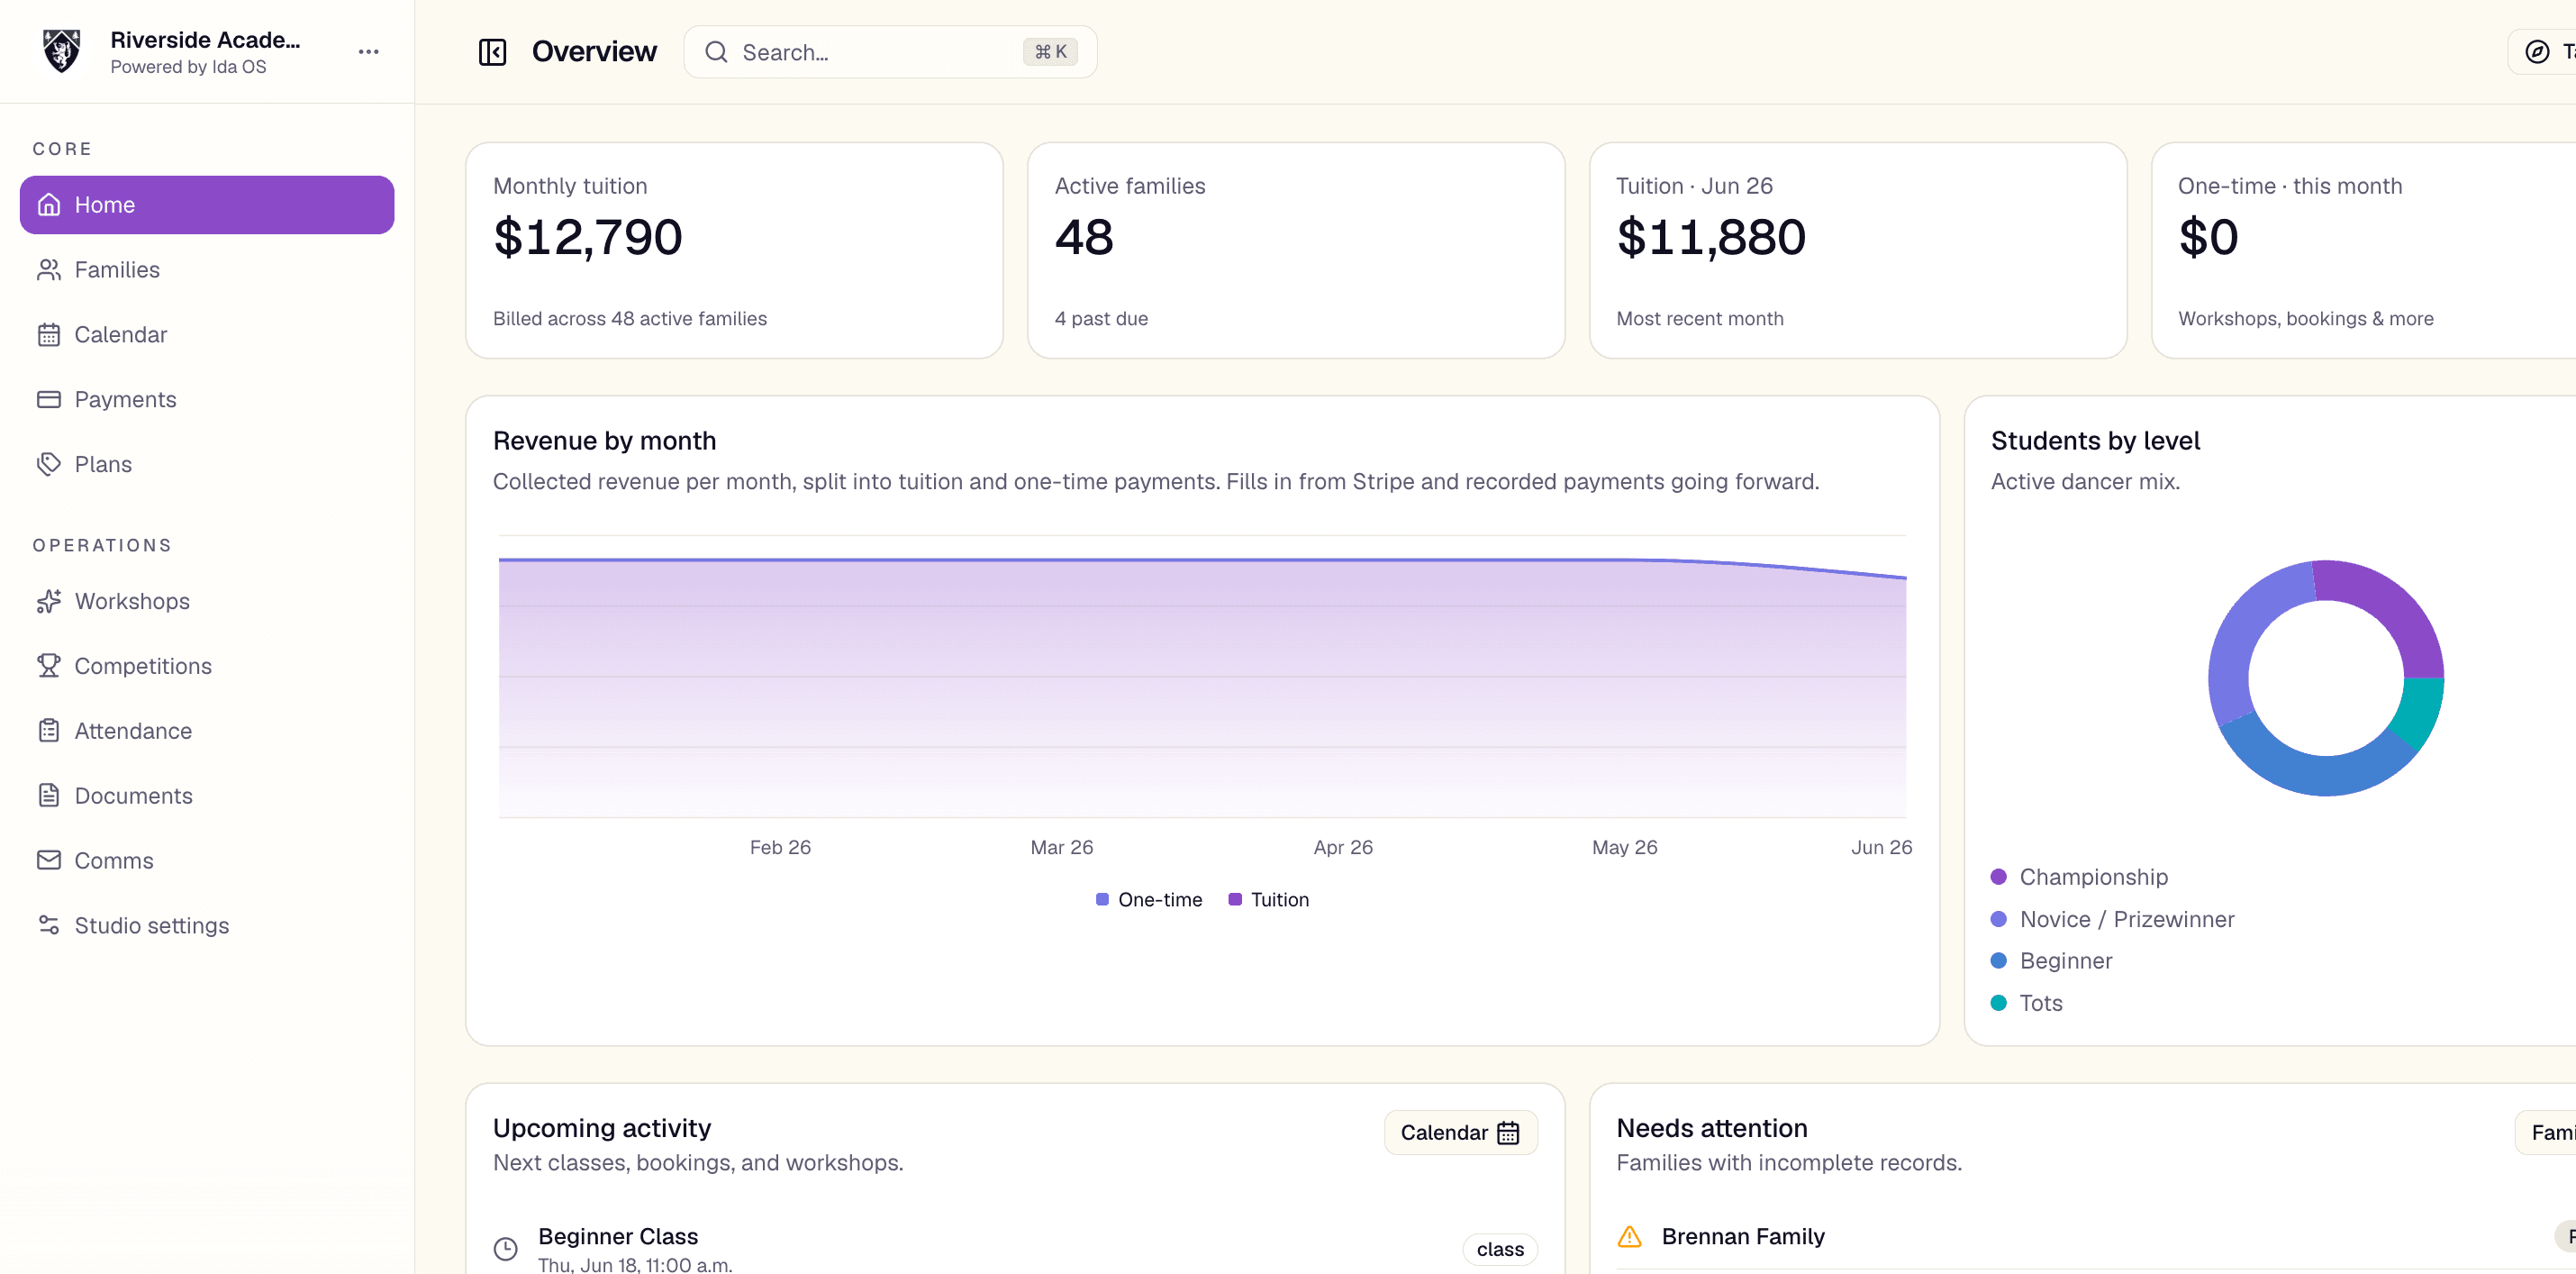
Staff land on an operations overview. Across the top you will find four summary cards — monthly tuition revenue, active families (with a count of anyone past due), active students (with the share at championship level), and the total collected for the most recent month. Use these as your daily pulse check.
Below the cards, a 'Tuition by month' chart shows collected tuition over time and a 'Students by level' chart shows your dancer mix. Further down, 'Upcoming activity' lists the next handful of classes, bookings, and workshops, and 'Needs attention' surfaces families with incomplete records.
Tip. The 'Needs attention' panel tells you exactly what is missing for each family — no tuition set, no email, no guardian, or a past-due balance — so you can clear problems before they become phone calls.
Your account & signing in
/dashboard/accountEveryone in Ida OS — staff and families alike — has an account page for personal sign-in settings. This is separate from your studio or family record; it controls how you log in.
Two ways to sign in
By default you can sign in with an emailed one-time code: enter your email, receive a code, and you are in — no password to remember. If you would rather use a password, you can set one and both methods will keep working.
Set or change your password
- 1Open your account page from the navigation.
- 2In the password section, enter a new password.
- 3Save. From now on you can sign in with either your password or an emailed code.
Run the studio
Families & students
/dashboard/familiesThe families area is your roster — the single source of truth for every household and dancer in the studio. Staff manage the whole roster here; families use the same area as their profile to keep their own details current.
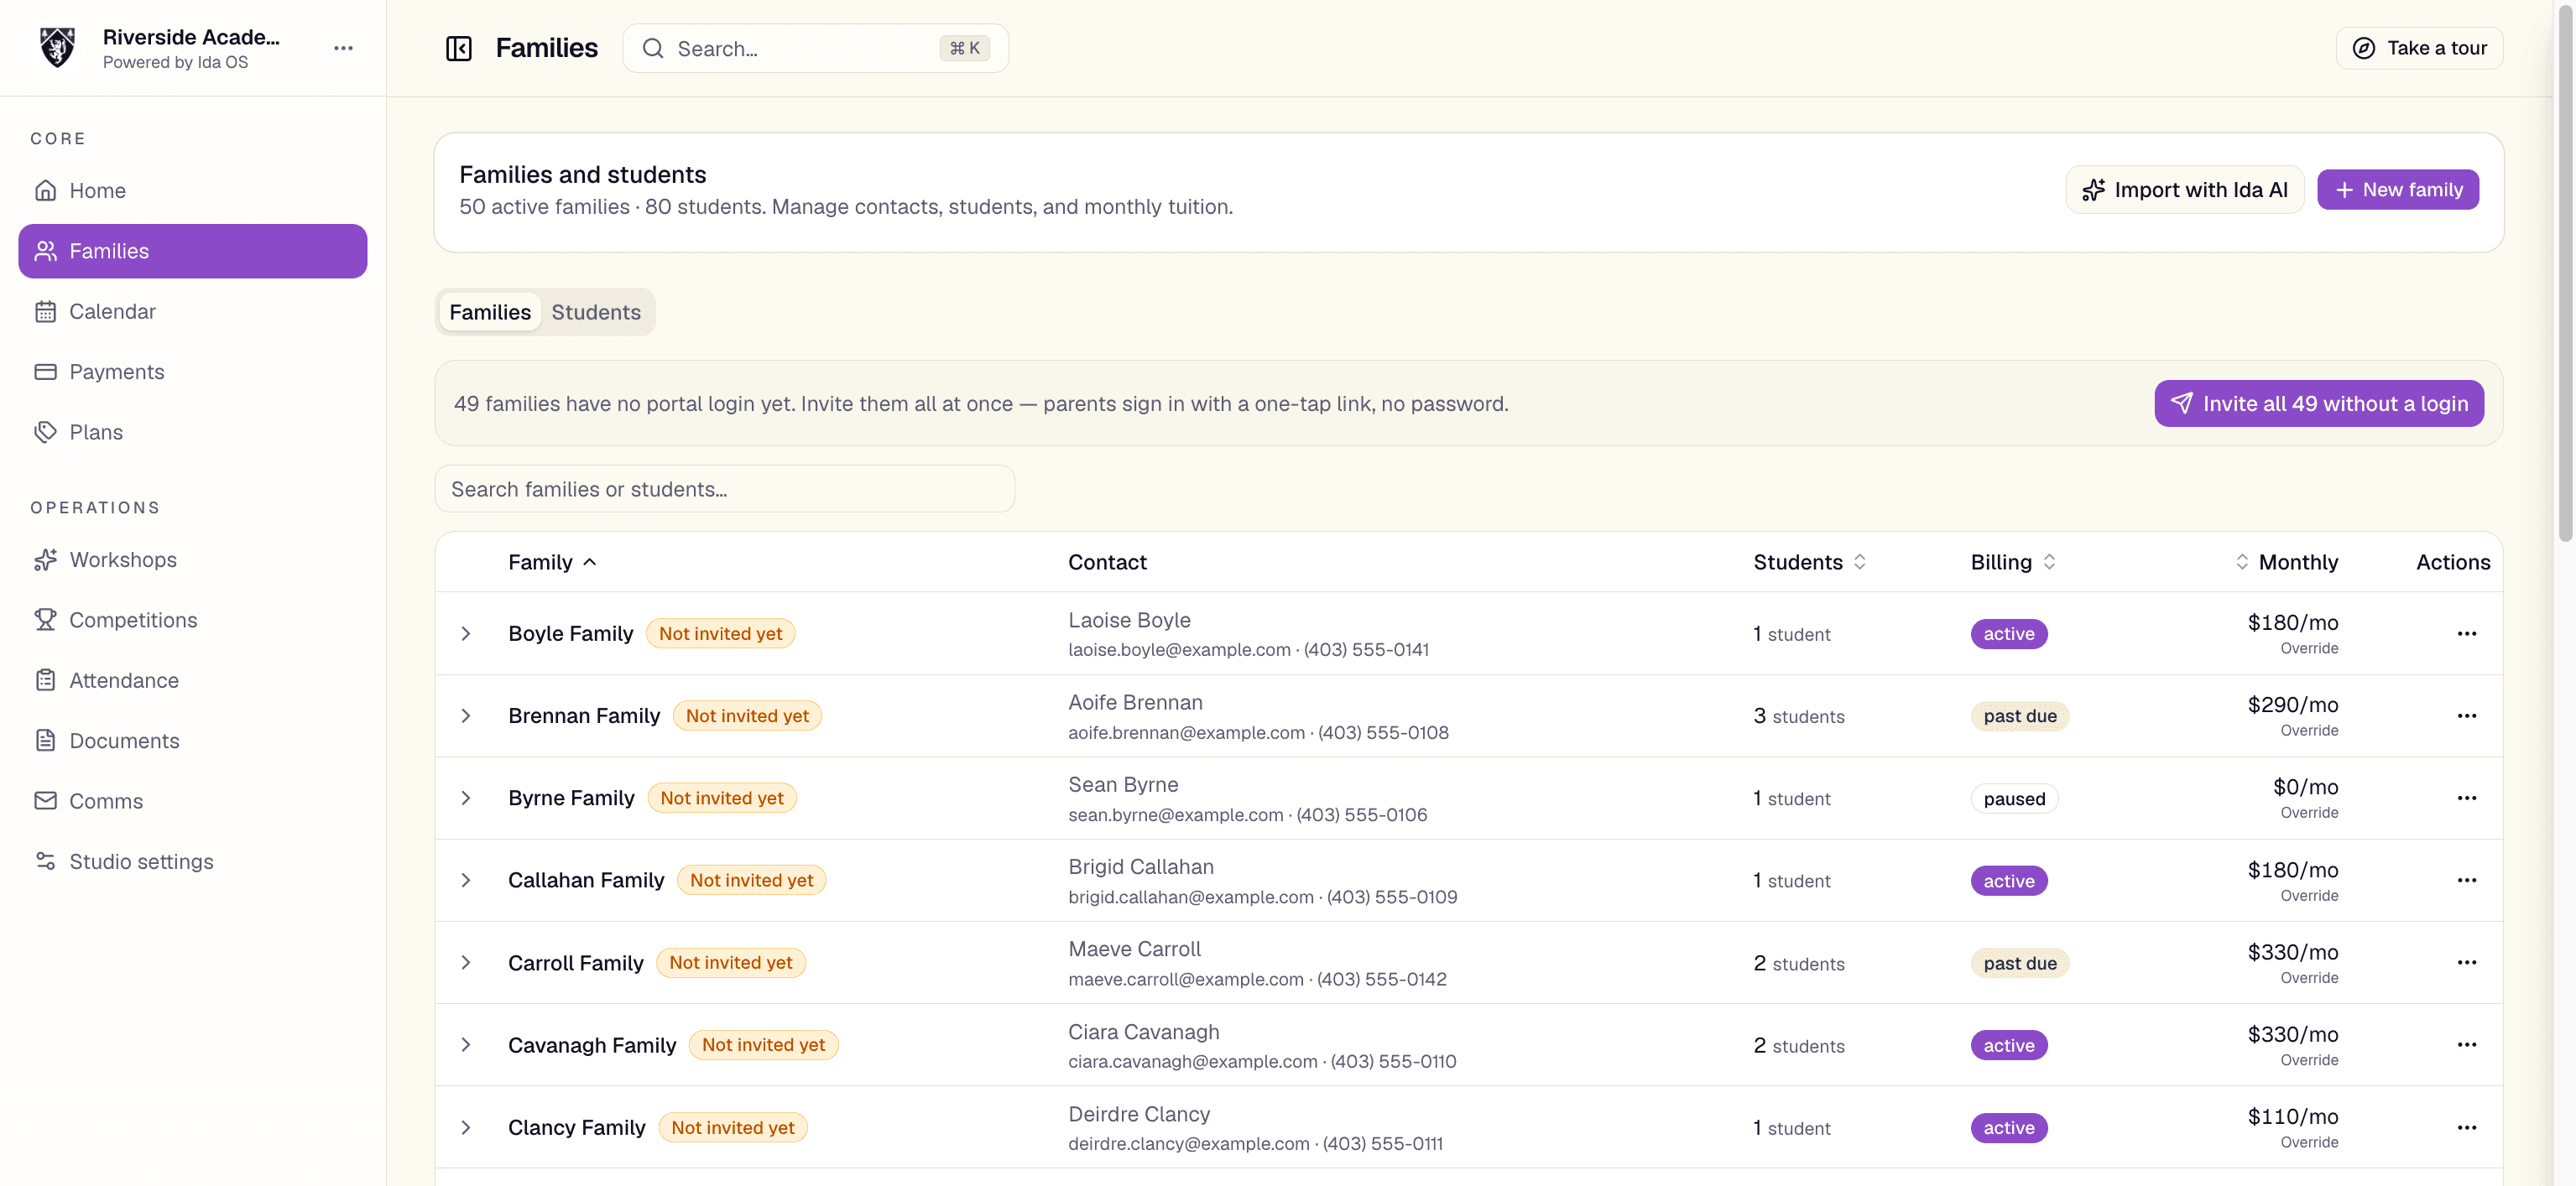
Browsing the roster
The roster is split into a Families tab and a Students tab, both searchable and sortable. Expand any family to see its contacts (the primary contact is badged), the emergency contact, and the students attached to it. Badges flag families that are archived or have not been invited yet, and you can toggle archived families in or out of view.
Adding families and students
Admins can grow the roster two ways: create a family by hand, or import many families at once. After importing, a bulk-invite bar lets you send portal invitations to everyone who has not been invited yet.
- 1On the Families tab, choose Create family (or Import to bring in a list).
- 2Fill in the family name, contacts, and emergency contact.
- 3Open the family and use Add student to attach each dancer with their name, birthdate, and level.
- 4When you are ready, invite the family by email so they can access their portal.
Note. Instructors can see the full roster but do not get the create, edit, invite, or delete actions — those are reserved for admins.
How tuition is set
Tuition is driven by each student's plan, not a single number on the family. Every student is assigned a plan when you set their level (tots, beginner, novice/prizewinner, or championship) — the level is the plan, and each plan carries its own monthly price. A family's monthly tuition is simply the sum of its active students' plan prices, so a household with two dancers at different levels bills the combined total automatically.
Because of this, you change what a family pays by setting each student's level on the student record (open a family and edit or add a student), not by typing a family-wide amount. The student form shows each level's price as you choose it, and the family's combined monthly total updates from there.
Tip. A student with no level/plan, or a family whose students have no priced plans, shows up in 'Needs attention' on the dashboard. Setting students' levels is what later lets the family start autopay from their Payments page.
Family-level tuition overrides
When a household needs something different from the per-student sum — a discount, a flat family rate, or a custom seasonal schedule — open the family's actions menu and set a tuition override. An override replaces the summed student plans for that family rather than layering on top of them, and it keeps their live Stripe subscription in step automatically.
Archiving vs. deleting
When a family or student leaves, prefer Archive (for families) or Mark inactive (for students). This keeps their history and stops billing without erasing anything. Permanent deletion is available but deliberately blocked when there is payment or booking history — Ida OS will tell you to archive instead so your books stay intact.
Heads up. Permanent deletion cannot be undone. A family with payment history, or a student with booking history, must be archived rather than deleted.
Calendar & bookings
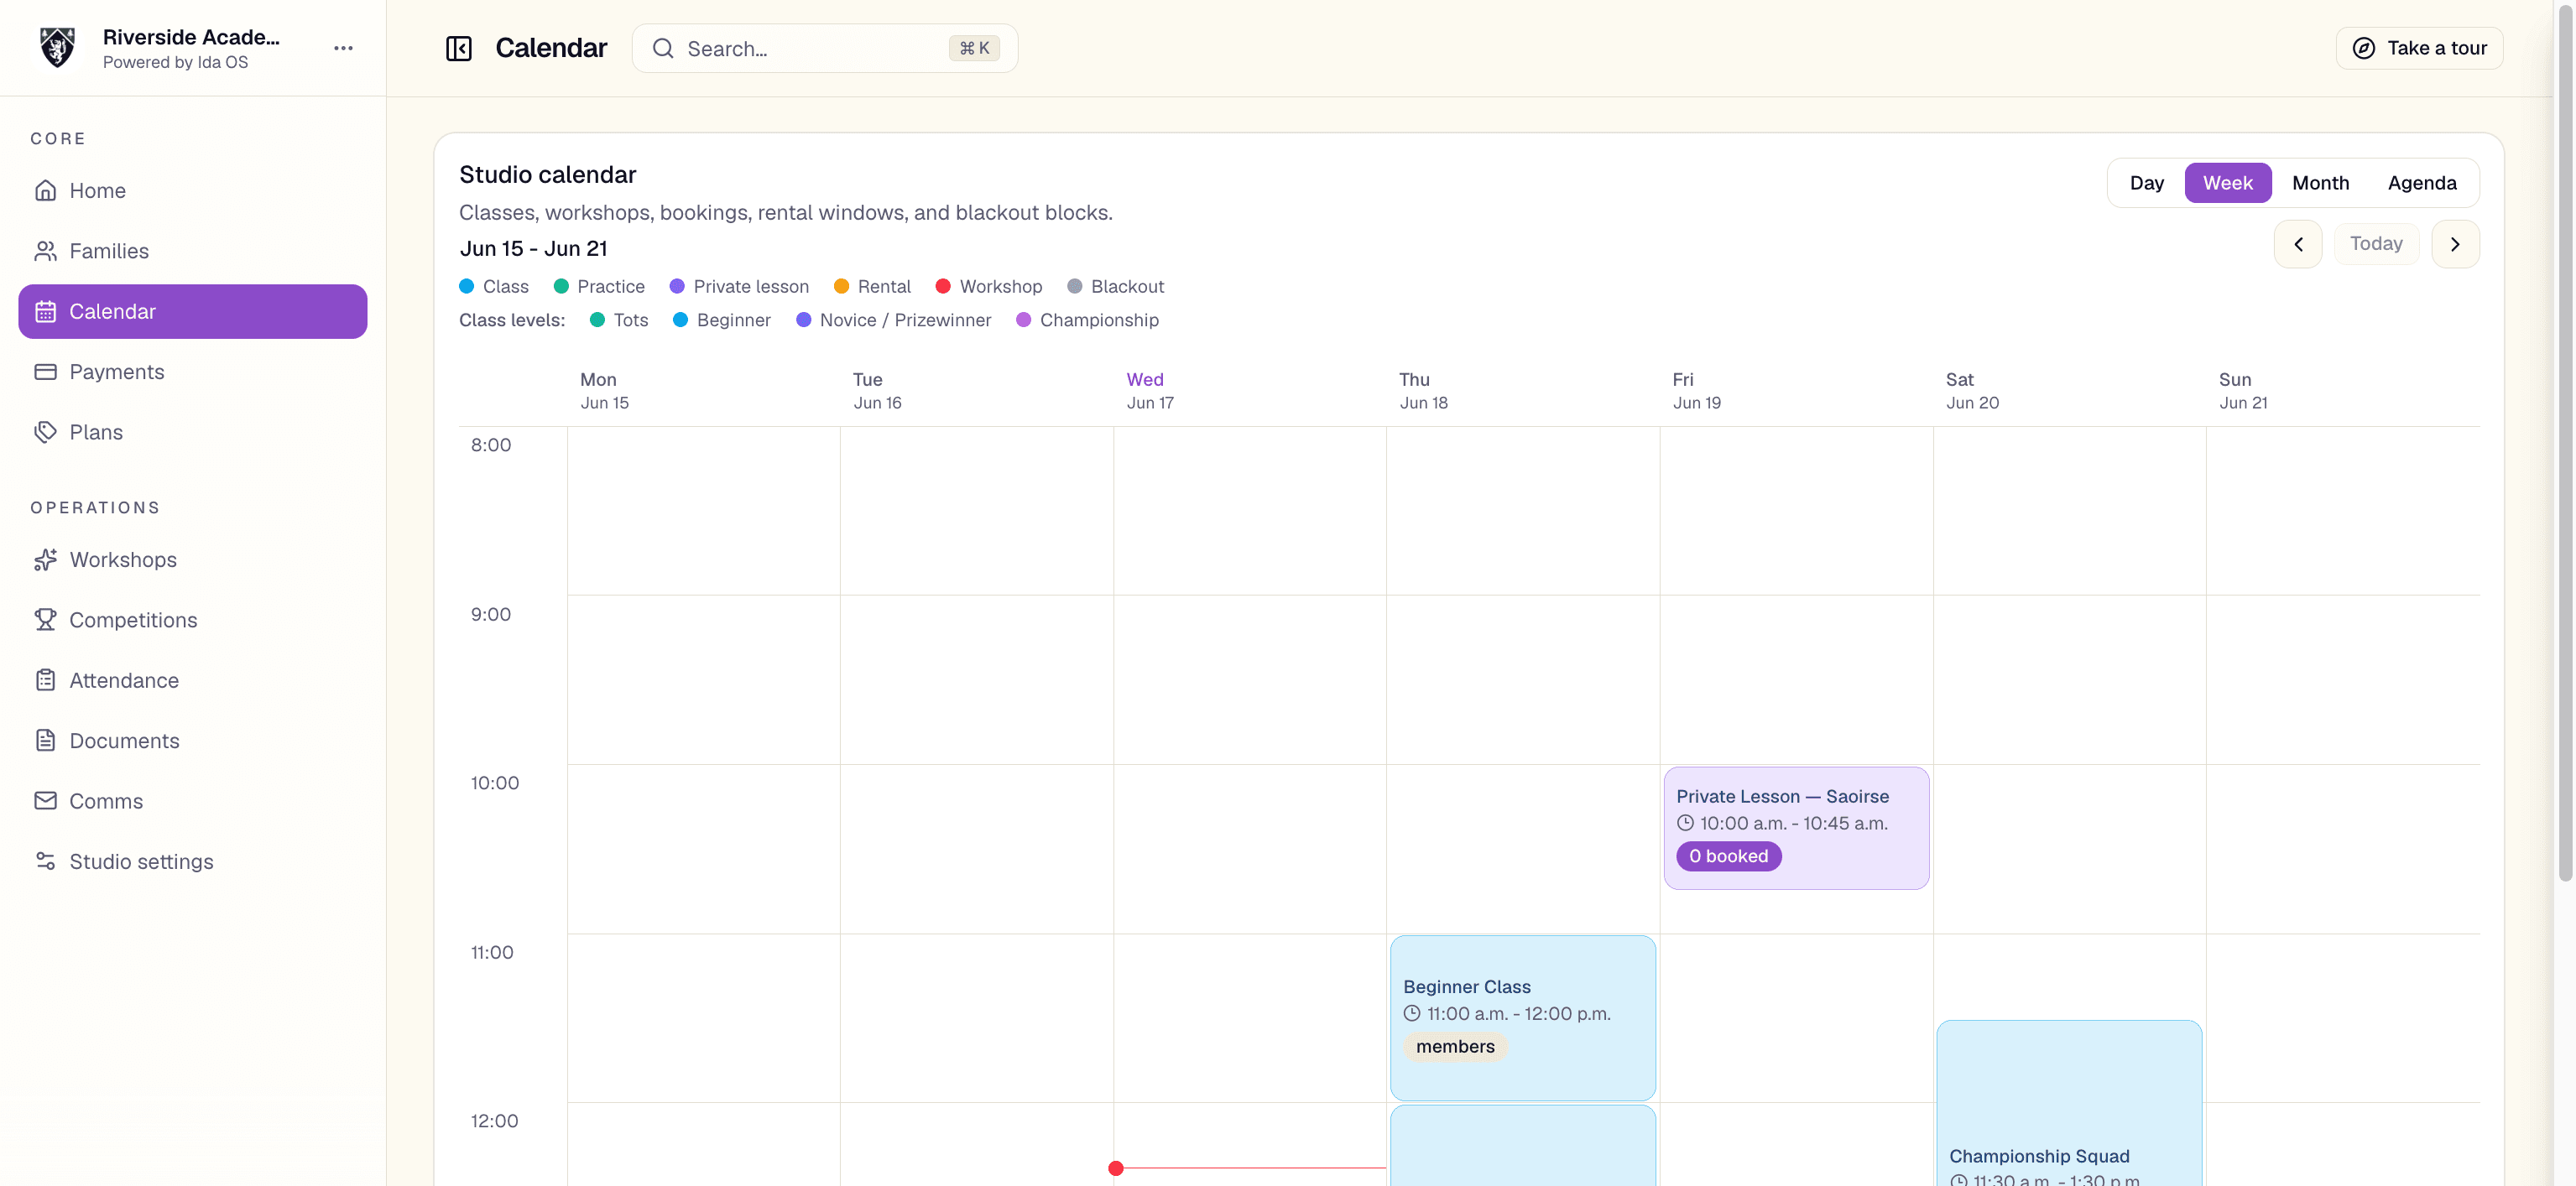
/dashboard/calendarThe calendar is the studio's single live schedule. Everything that happens in a room — classes, practices, private lessons, rentals, and workshops — lives here, and families book against it in real time. You can view it by Day, Week, Month, or Agenda, jump to today, and a live line marks the current time.
Creating a calendar block
Staff build the schedule by adding blocks. Click any empty time slot to open the block editor.
- 1Click an empty slot on the calendar.
- 2Give the block a title and choose its type: class, practice, private lesson, rental, workshop, or blackout.
- 3For a class, optionally tag a dance level (tots, beginner, novice/prizewinner, or championship) — this color-codes the class by level on the calendar.
- 4Set its visibility — members, public, staff-only, or a private invite where you tick specific families.
- 5Enter the start and end times, a member rate and an external/guest rate if it is paid, and a capacity.
- 6Assign one or more instructors and add any notes.
- 7To repeat it, set a recurrence (daily, weekdays, weekly, biweekly, or monthly) with an end date — overlapping occurrences are skipped automatically.
Tip. Blocks are color-coded by type, and classes by their dance level, with a legend under the calendar. You can recolor any of these in Settings → Branding. Use 'blackout' blocks for closures and holidays so families can see at a glance when the studio is unavailable.
Editing and managing blocks
Open any block to edit its details, change instructors, or delete it. You can delete a single occurrence or an entire recurring series. Capacity cannot be set below the number of people already booked, and a block with active bookings cannot be deleted until those are cleared — this protects families who have already signed up.
Approving who attends
Each bookable event has an attendee roster. You can approve, decline, or remove individual bookings right from the event, and a 'Booking requests' table at the bottom of the calendar collects everything waiting on your approval in one place.
Class attendance
/dashboard/attendanceAttendance lets you track who shows up to each class, session by session, and roll it up into a record over time. You take it right from a class on the calendar, and the totals appear next to each student and on a studio-wide Attendance report — so when a dancer's results slip, you can point to exactly how many classes they missed.
Building a class roster
Attendance starts from a class roster — the list of dancers who belong to a class. Open a class on the calendar and use 'Manage roster' to tick the students in it. For a recurring class the roster is shared across the whole series, so you set it once and it applies to every session; for a one-off class it applies to that single occurrence. The picker suggests students whose level matches the class to speed this up.
Taking attendance
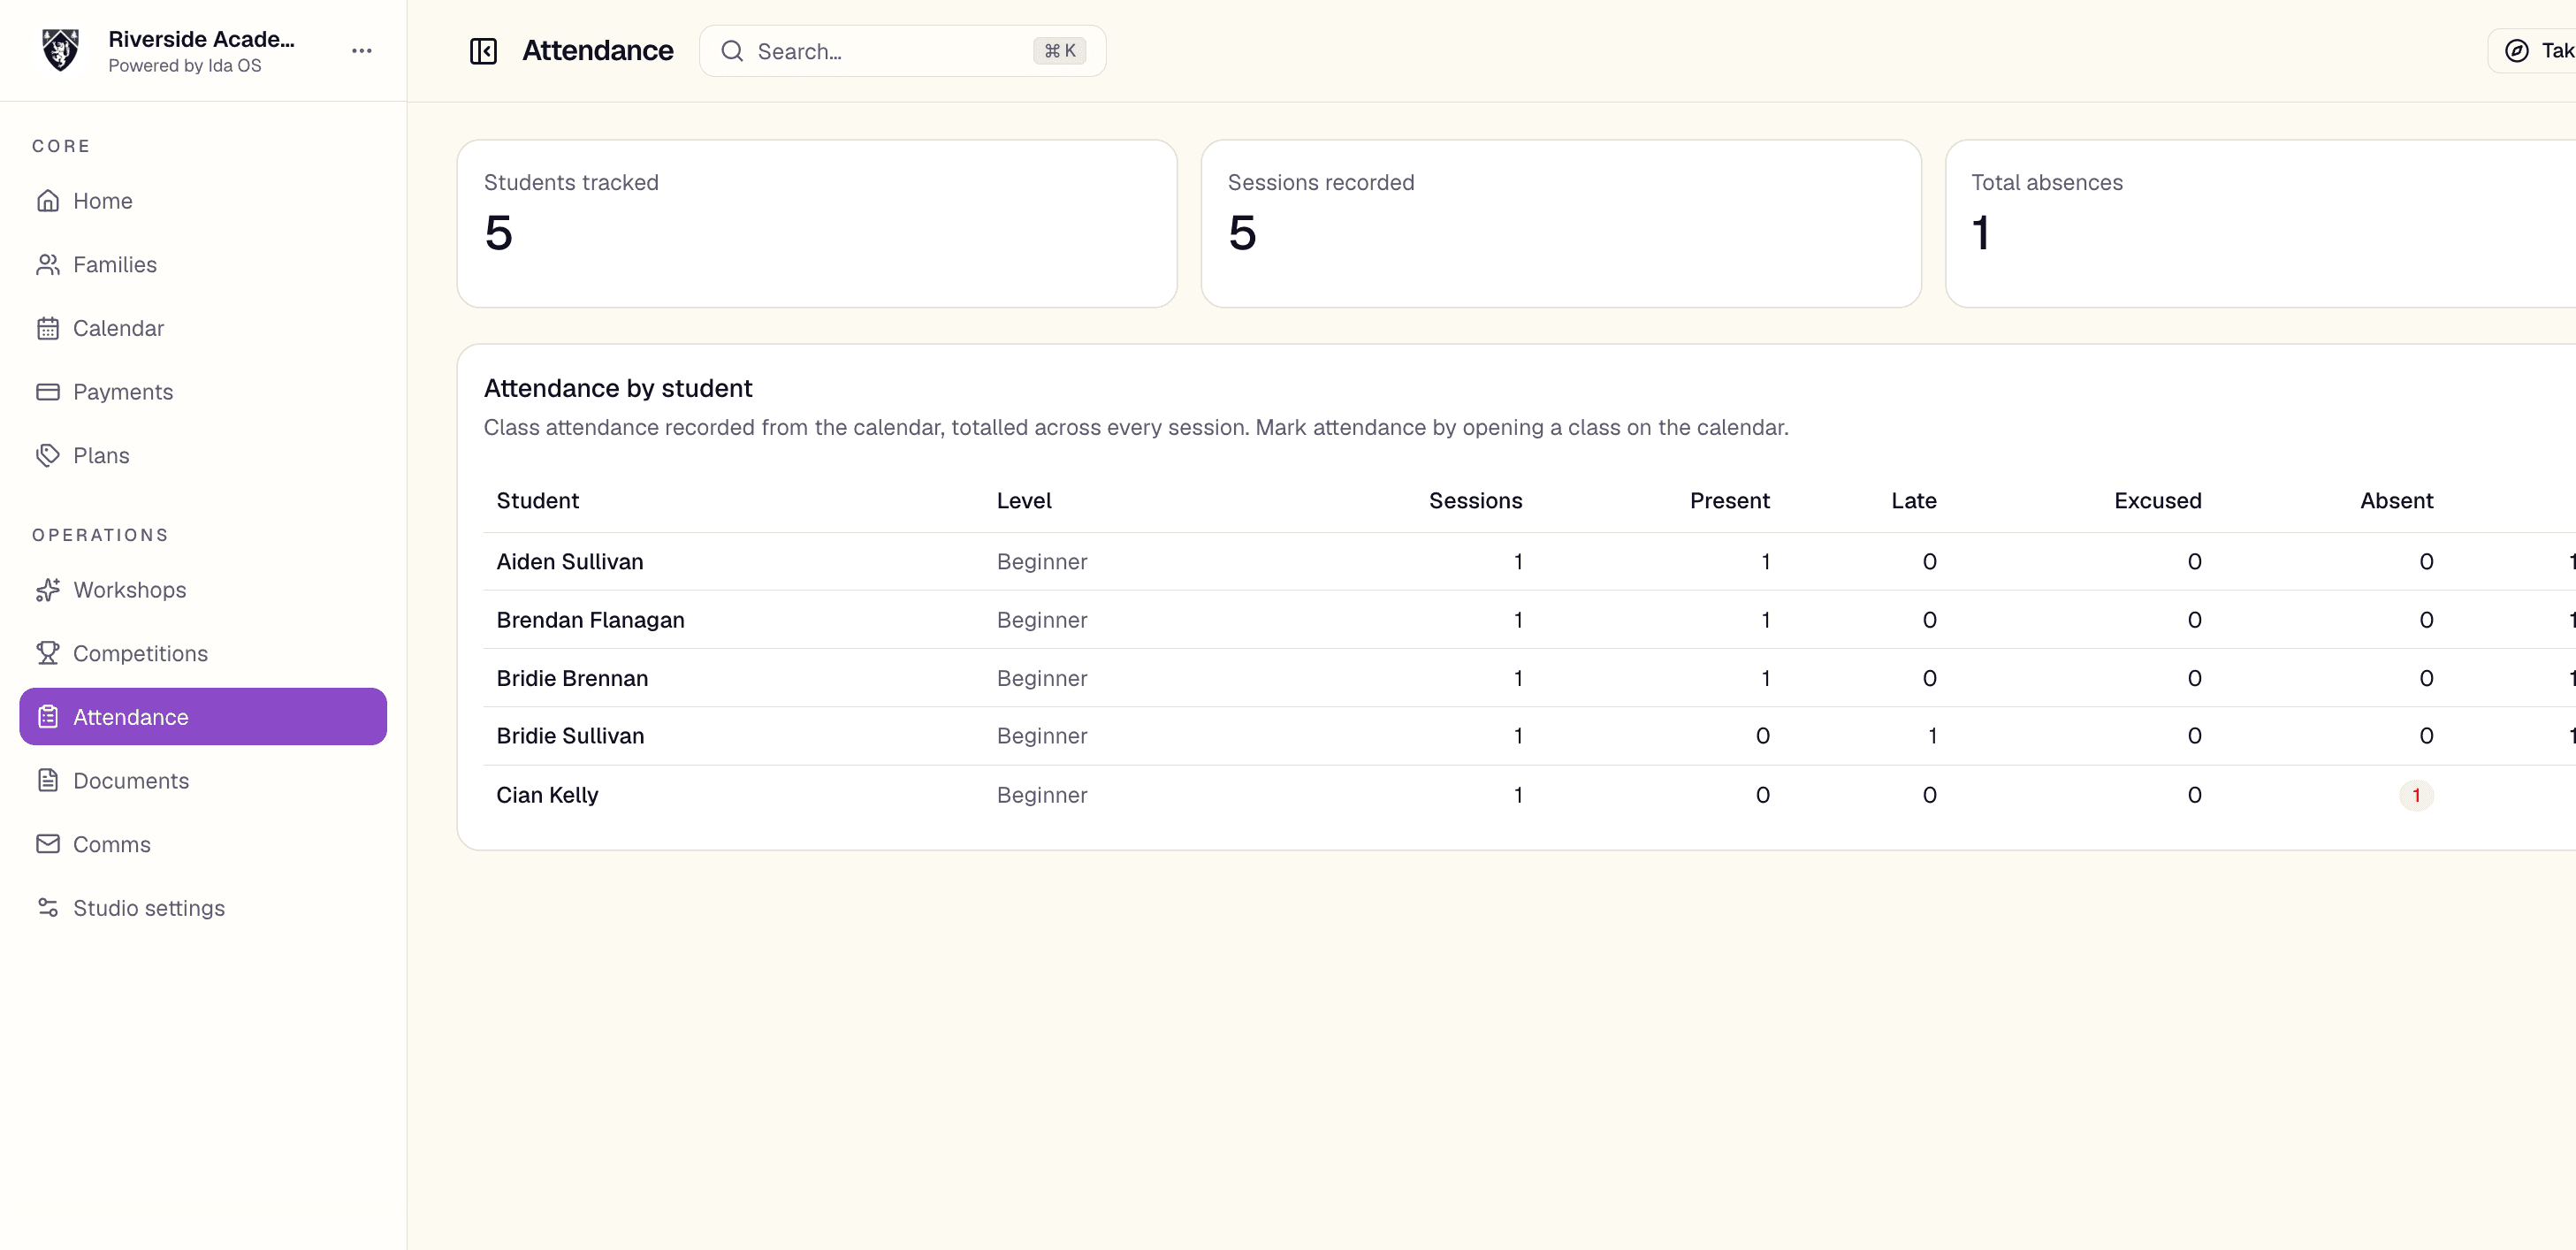
Open a class for the day and you will see its attendance checklist. Tap each rostered dancer as Present, Late, Excused, or Absent — a running 'present / total' count sits at the top. Marks save instantly and can be changed any time, and each session is recorded on its own, so a recurring class keeps a separate record per date.
Note. Both admins and the instructors assigned to a class can take its attendance. Instructors do not need any financial access to do so.
The attendance report
The Attendance page gives you the studio-wide picture: every student with their total sessions, present / late / excused / absent counts, and an attendance rate. Sort by rate to surface the dancers slipping through the cracks. The same rate also shows in the Students tab, where opening a student reveals their recent sessions.
Documents
/dashboard/documentsDocuments is the studio's shared library — tournament packets, FAQs, forms, policies, and training videos in one place instead of scattered email attachments. Staff control exactly which families see each file, and Ida AI can read your documents so it can answer questions about them.
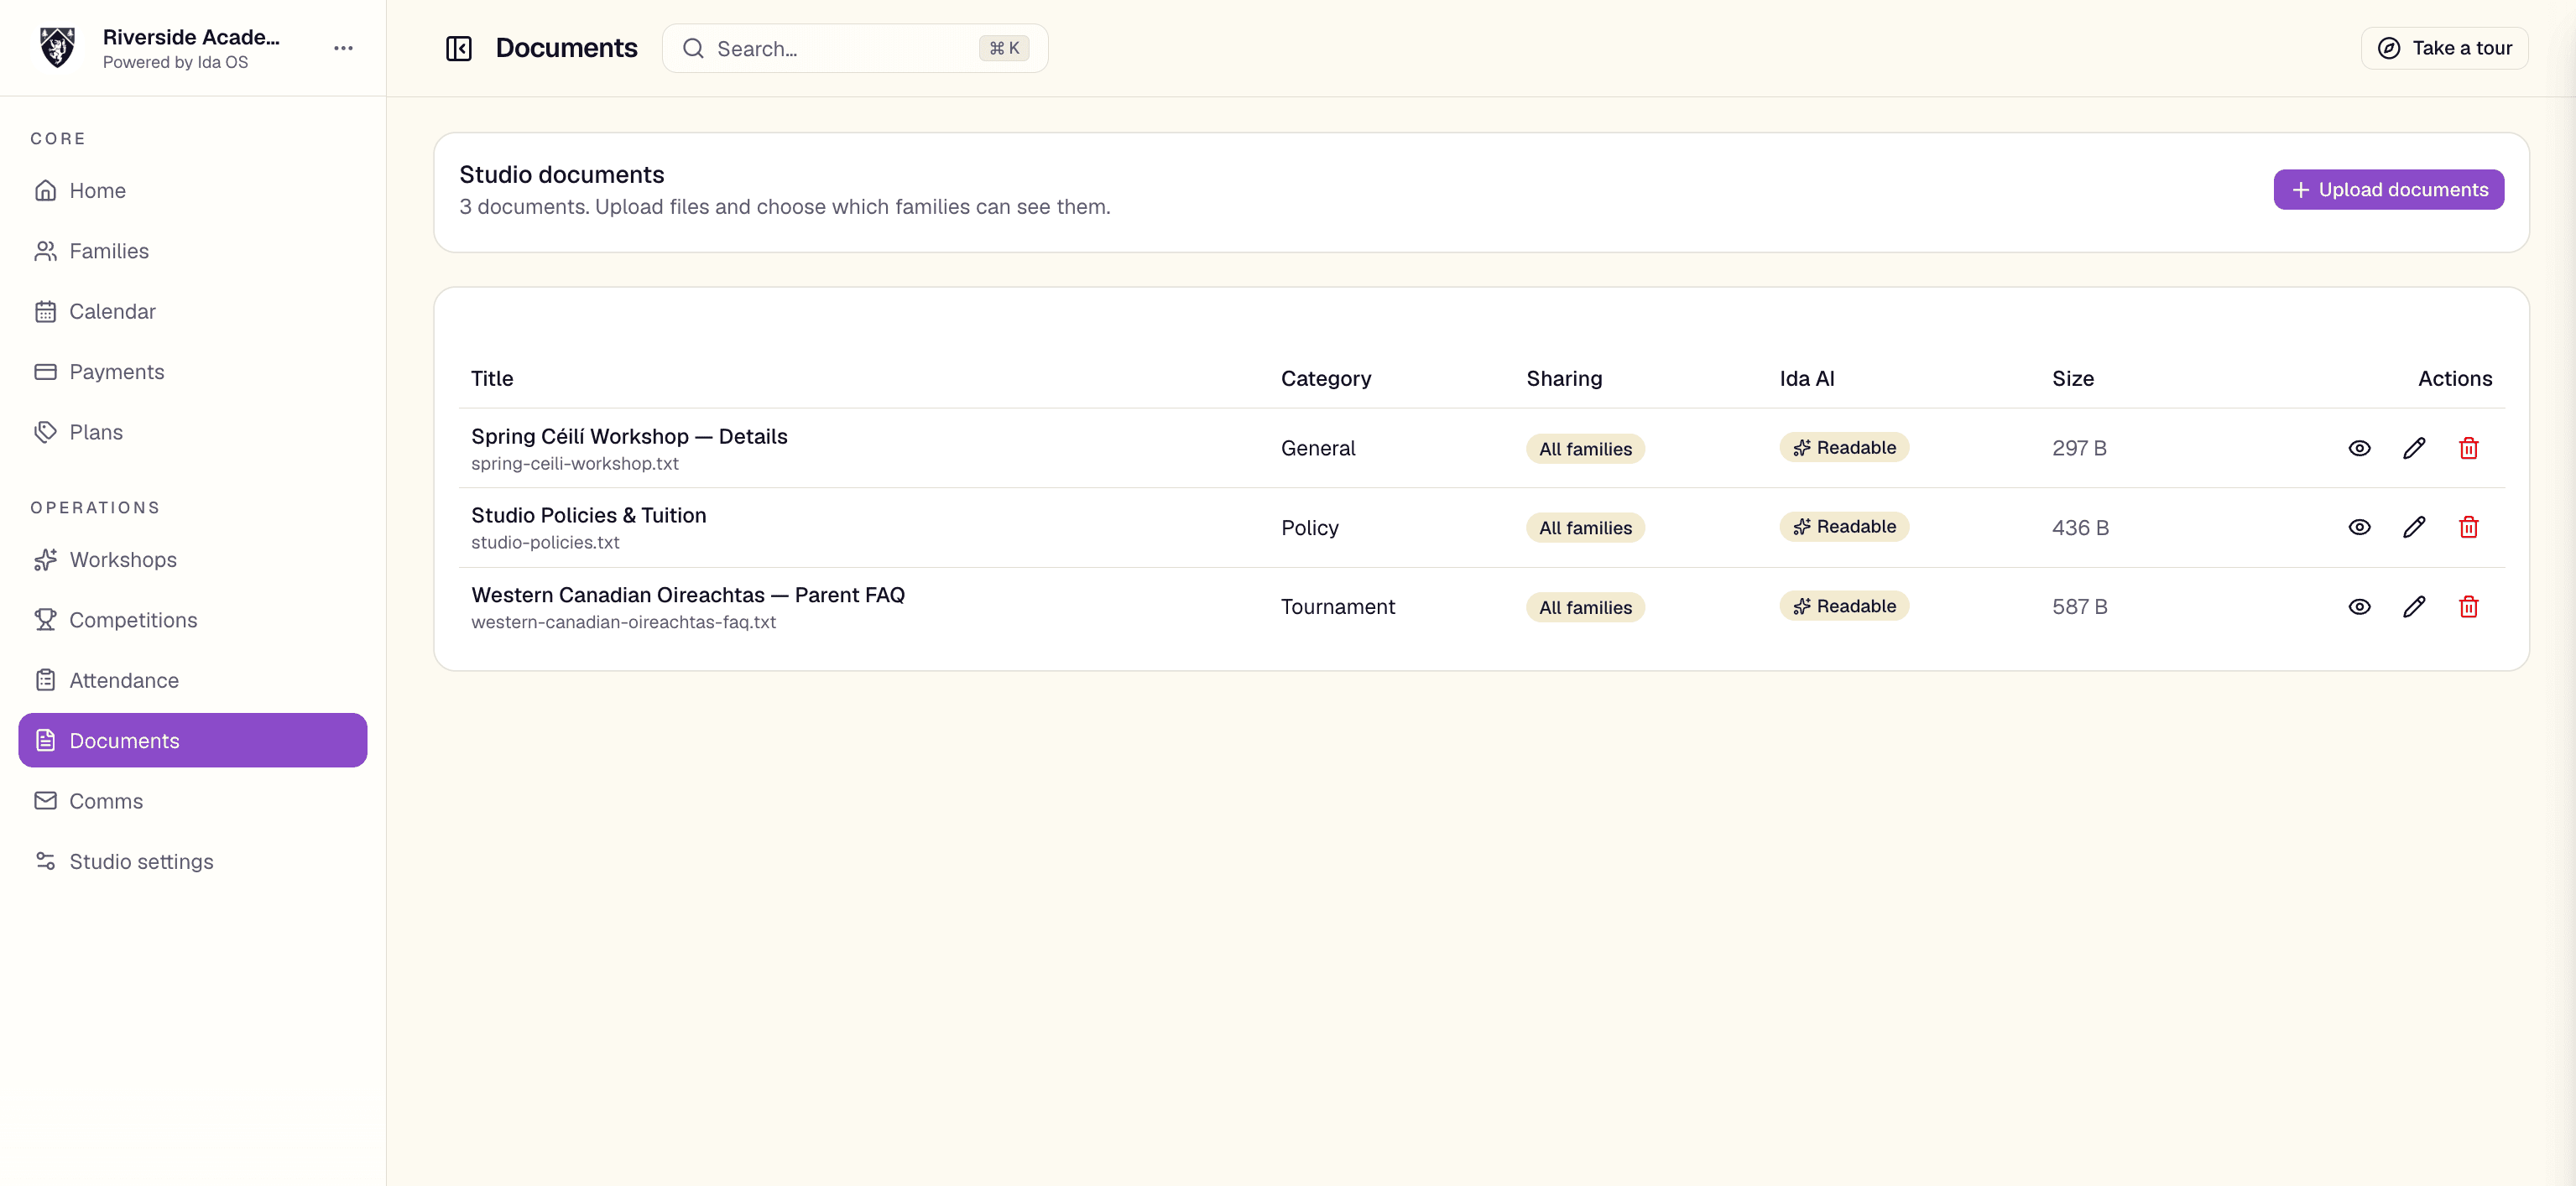
Uploading and sharing a document
- 1Choose Upload and select your file.
- 2Pick a category: general, tournament, FAQ, form, video, or policy.
- 3Decide who can see it — all families, a specific set of families, or staff only.
- 4Save. The document appears in the library with an 'Ida AI readable' indicator showing whether the assistant can answer questions from it.
Tip. Clearing all sharing on a document reverts it to a staff-only draft, which is handy while you prepare something before releasing it to families.
Get paid
Tuition plans
/dashboard/plansTuition plans define the packages you bill against — how many classes a week, the monthly price, practice and registration rates. Each plan corresponds to a dance level (tots, beginner, novice/prizewinner, championship) and is kept in sync with a Stripe product and price so recurring billing 'just works'. You set your plans up here, and they are assigned to students by level on the student record; a family's monthly tuition is the sum of its active students' plans.
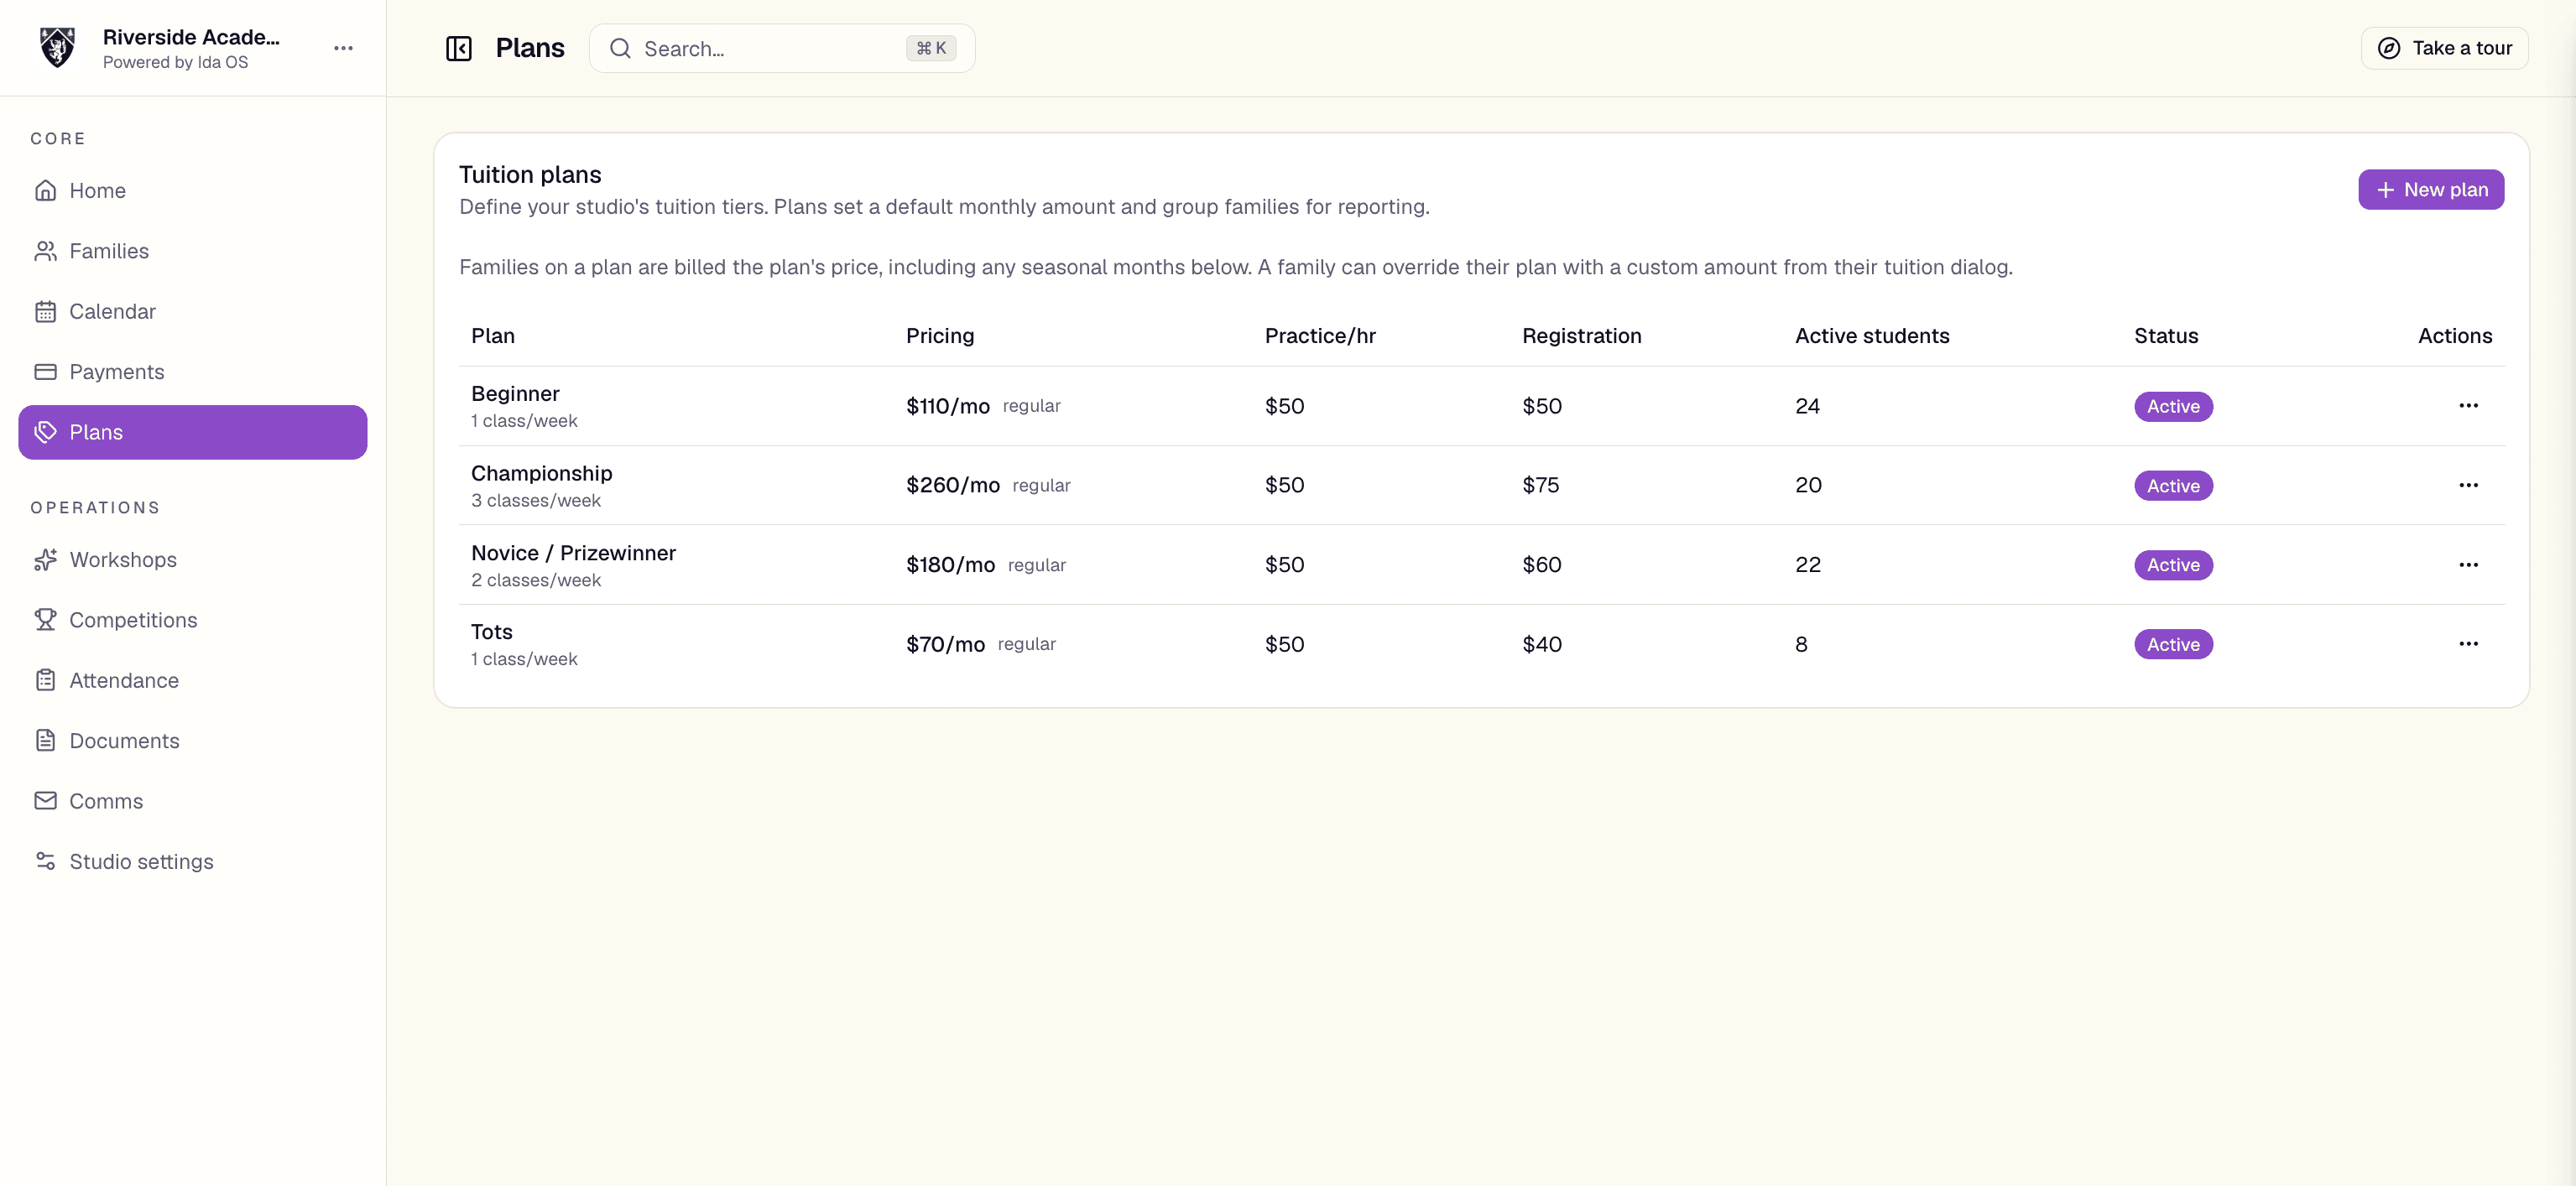
Creating a plan
- 1Open Tuition plans and choose to create a new plan.
- 2Name the plan, choose the dance level it covers, and set the weekly class count, monthly price, practice hourly rate, and registration fee.
- 3Save. Ida OS creates the matching Stripe product and price automatically.
Note. A plan is tied to a level, so assigning a student to that level on their student record is what puts them on the plan. You do not assign plans to families directly — the family total is the sum of its students' plans.
Seasonal (per-month) pricing
Tuition does not have to be the same every month. Alongside the flat monthly price, a plan can carry seasonal exceptions — pick a month and set what it should cost instead. You only add the months that differ; every other month falls back to the flat amount, so a summer at a lower rate or a dark December is a couple of entries rather than a whole separate plan.
Seasonal pricing also works per family: a family can carry its own month-by-month schedule when they need something different from their plan. Ida OS keeps each family's live Stripe subscription in step with their seasonal schedule automatically — when an upcoming month is priced differently, the change is scheduled for that family's next billing date, with no mid-cycle charge or proration.
Note. A family's own tuition override is self-contained: setting a family's flat amount or seasonal months replaces the plan's pricing for them rather than layering on top of it. Manual-billing families are display-only and are never re-billed automatically.
Changing prices safely
Editing a plan's monthly amount creates a new Stripe price for future subscribers. Families already subscribed stay on the price they signed up at, so a price change never silently re-bills existing families.
Heads up. Archiving or deleting a plan archives its Stripe product and price rather than destroying them. Existing subscriptions keep billing; only future enrolment is affected. You will be warned how many active students would be unlinked.
Payments
/dashboard/paymentsPayments is the studio's ledger. Tuition, bookings, workshops, and competition fees all flow through one place, powered by Stripe. Staff track and reconcile the money; families pay and manage their own billing.
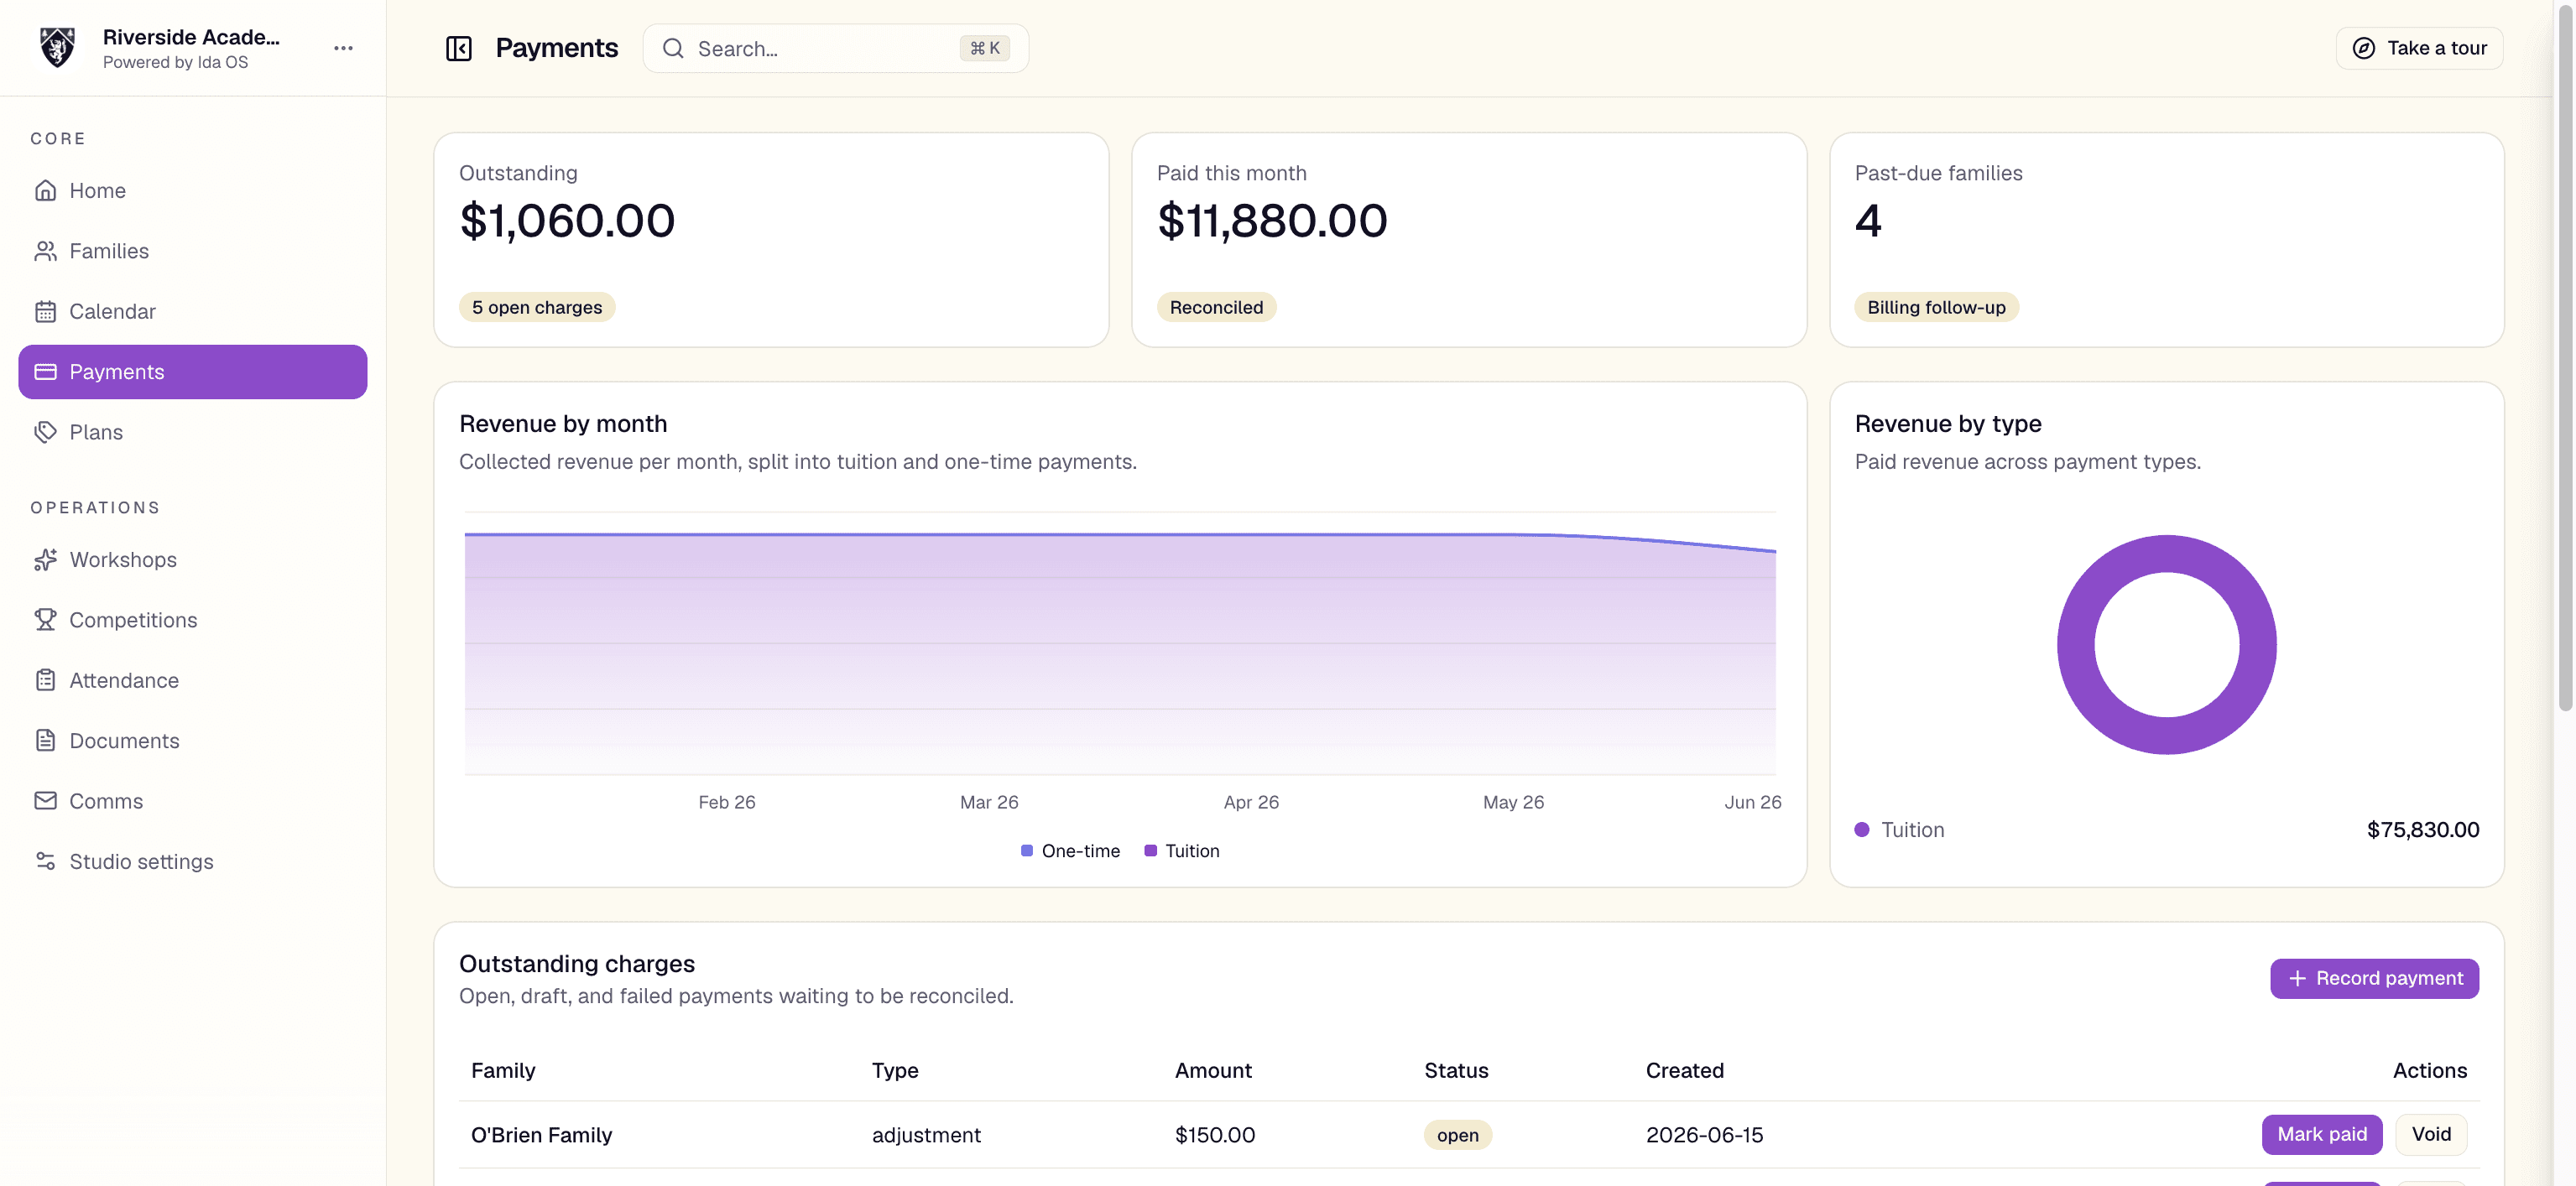
Tracking the money
The top of the page summarises your outstanding total (with a count of open charges), how much you have collected this month, and how many families are past due. Below that, a monthly tuition matrix shows each family's tuition month by month — historical months come from your previous tracker, and new months fill in automatically from Stripe and recorded payments.
Recording, voiding, and refunding
Admins can record a payment that came in outside Stripe, mark an outstanding charge as paid, void a charge that should not have been raised, or refund a paid payment (which issues a Stripe refund, or marks it manually refunded when it was an offline payment).
Note. Instructors can view the payment tables but do not get the record, void, or refund actions.
When tuition bills each month
By default each family on autopay bills on the anniversary of the day they signed up. If you would rather everyone bill on the same day, set a fixed tuition billing date in Settings (a day from the 1st to the 28th, so it lands in every month). New autopay sign-ups then anchor to that day; families already on autopay keep their existing date.
Tip. With a fixed billing date, a family that signs up part-way through the month is not charged immediately — the partial first period is free and the first full charge lands on your chosen day.
Workshops
/dashboard/workshopsWorkshops let you sell camps, intensives, and guest sessions to your own families and to outside dancers at separate prices. Behind the scenes a workshop is simply a calendar event of type 'workshop', so creating one happens on the calendar and the money lands in the same ledger as everything else.
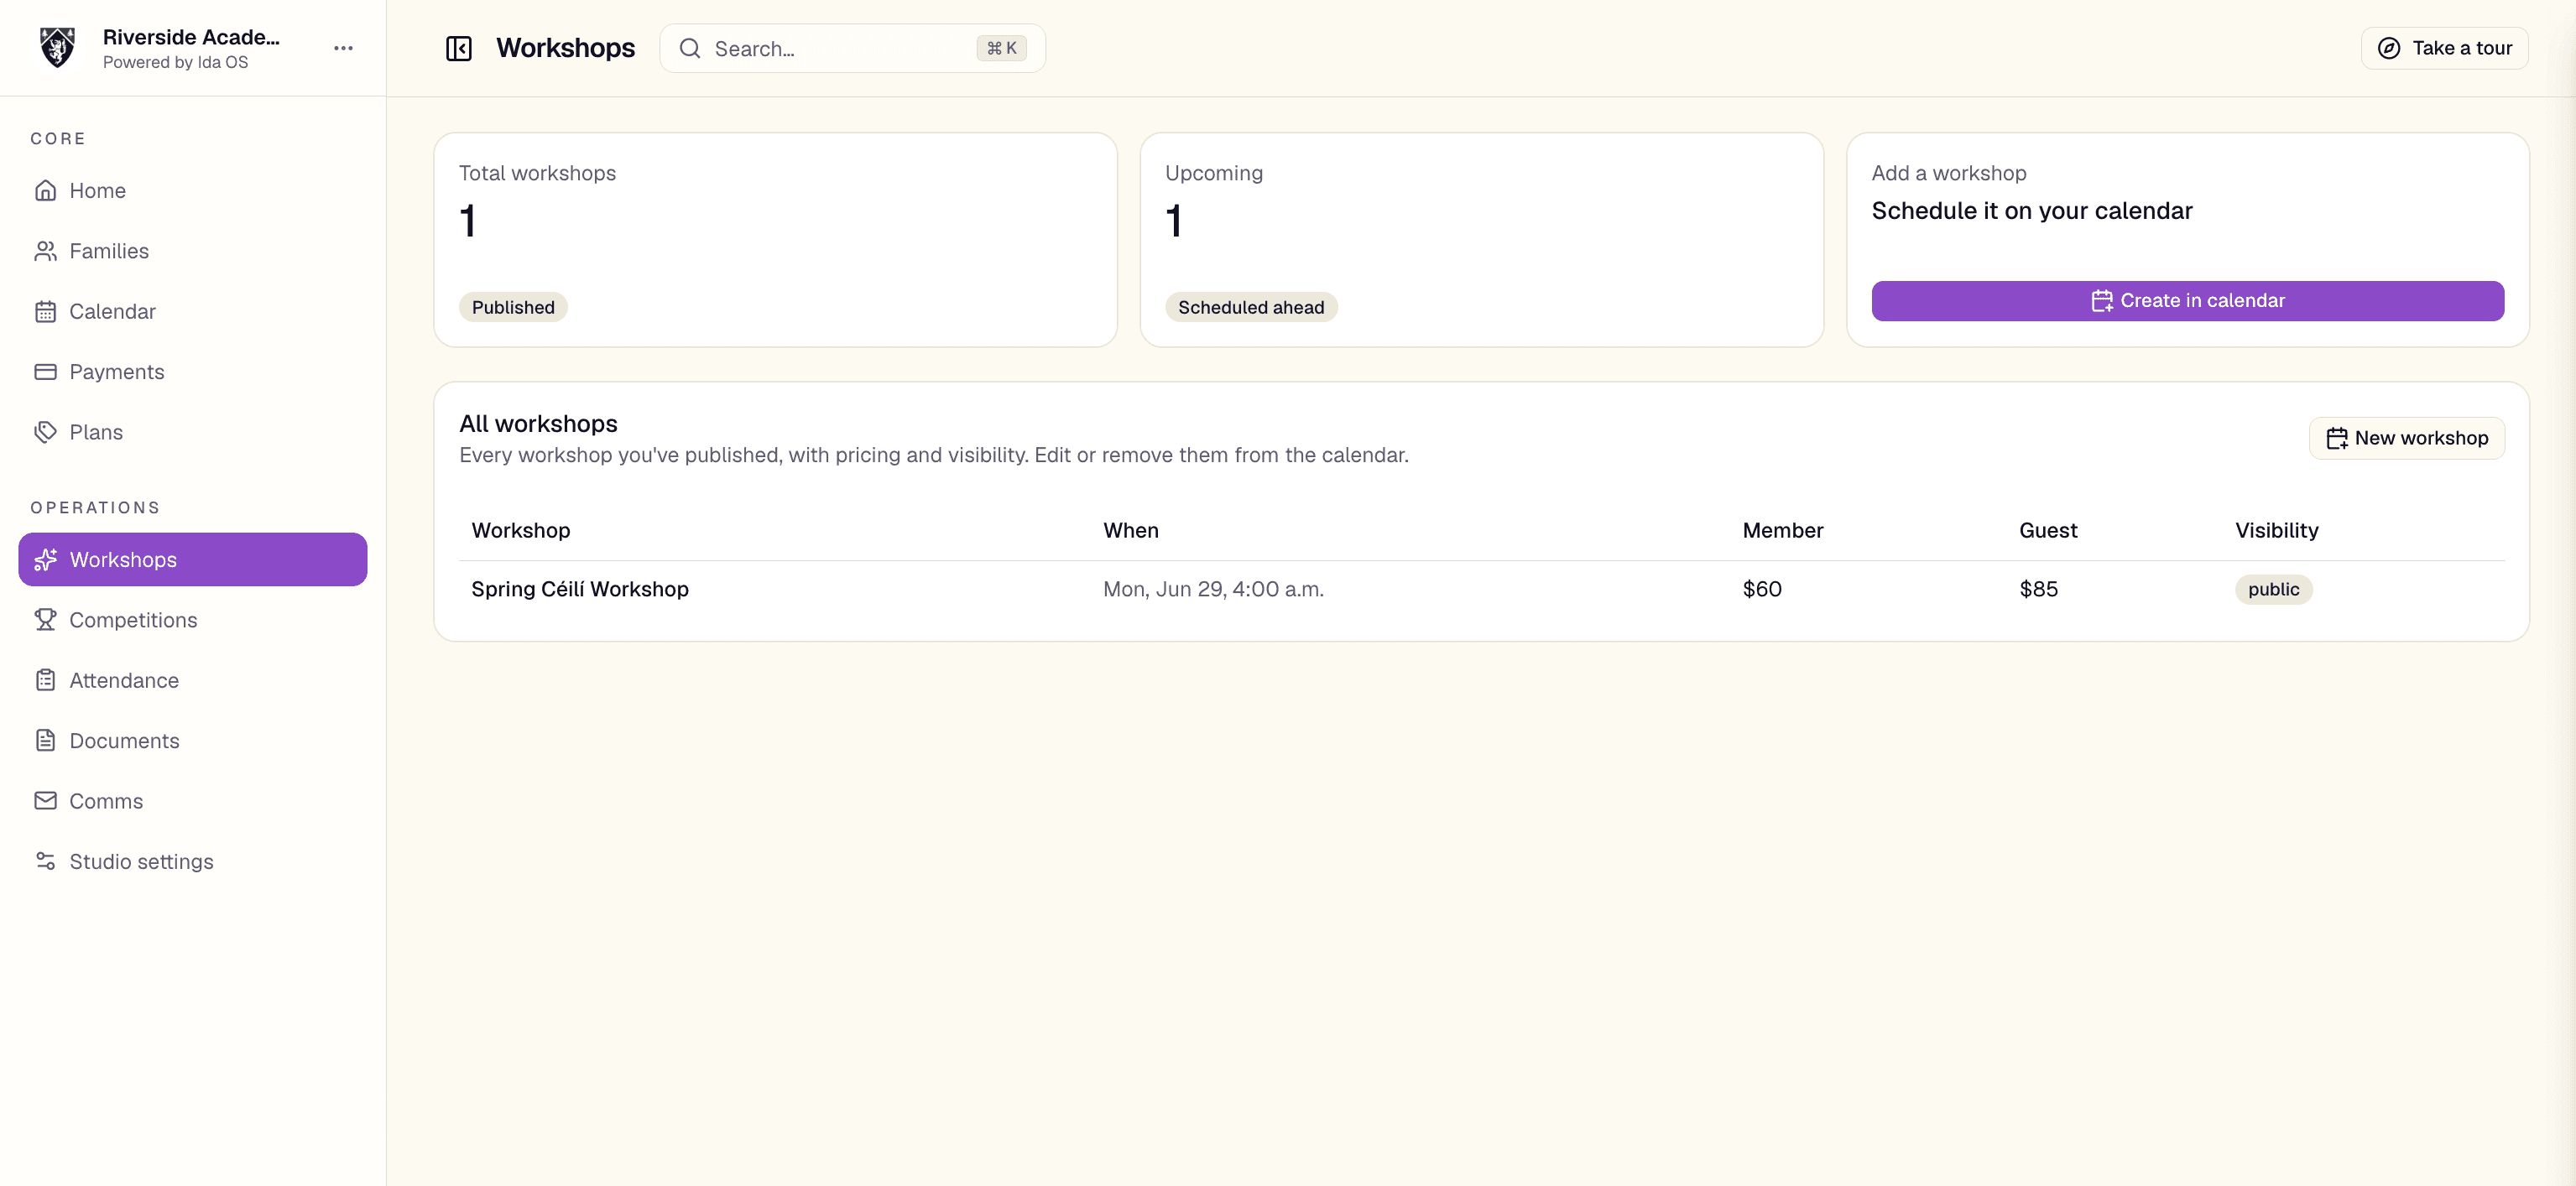
Publishing a workshop
Create a workshop the same way you create any calendar block — choose the 'workshop' type, set a member rate and a guest rate, and a capacity. The Workshops page then gives you a clean summary of every published workshop (title, time, member and guest prices, visibility), with quick links back to the calendar to edit or remove them.
Competitions
/dashboard/competitionsCompetitions is built for feis-style schools that front entry fees to organizers and recover them from families. It tracks what you have paid out, what you have recovered, and what is still owed — per event and per dancer.
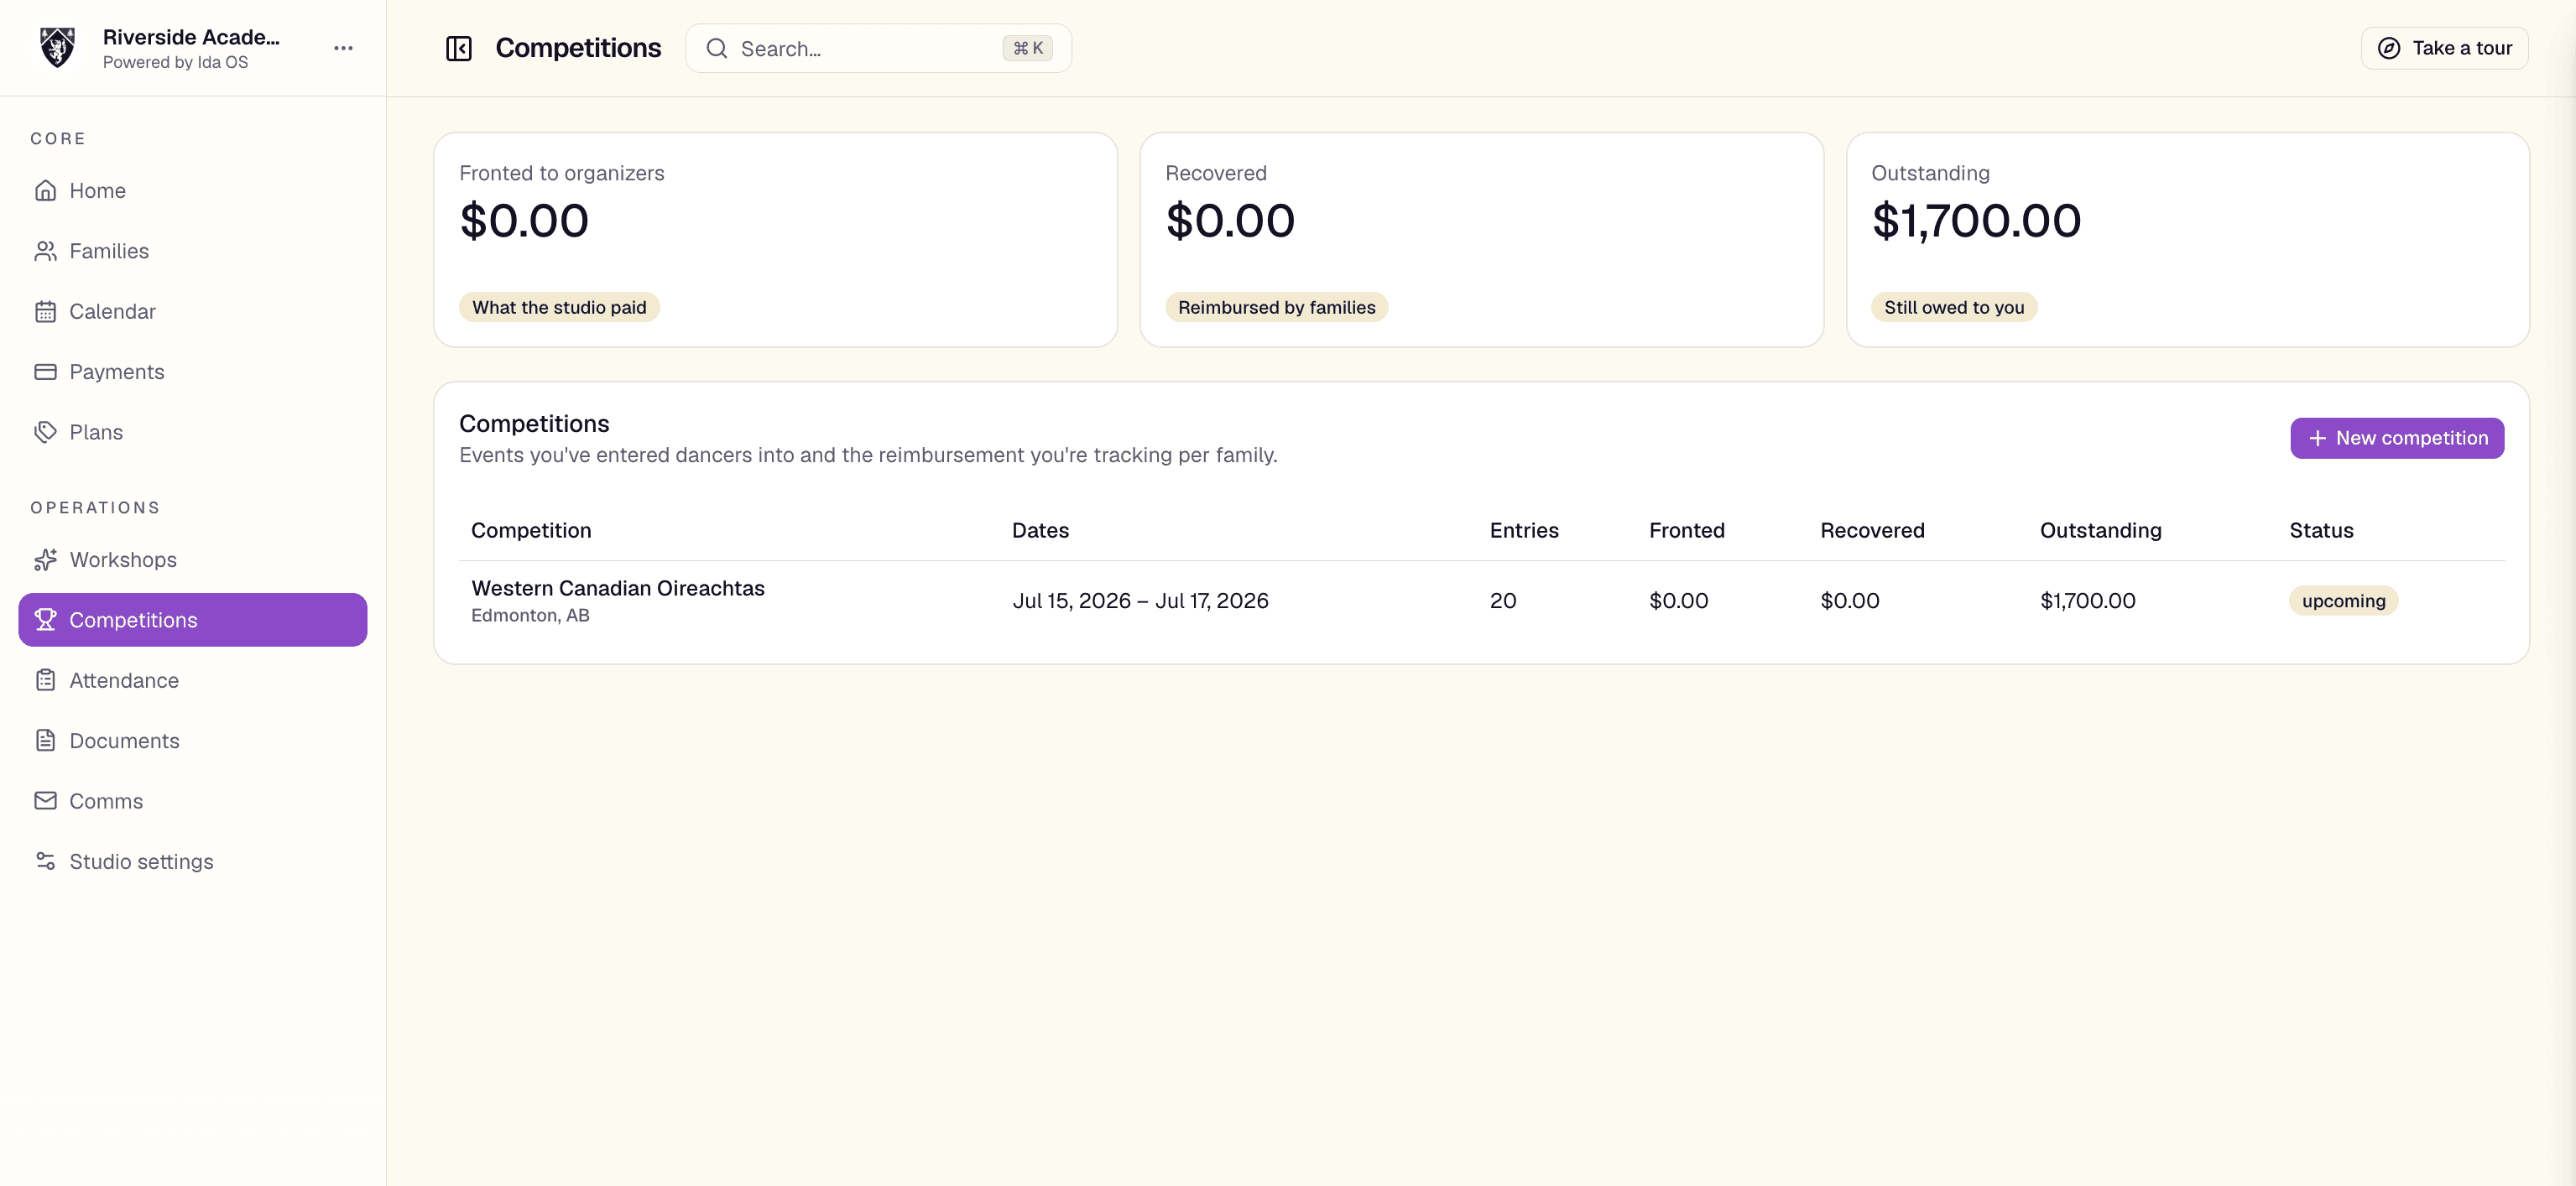
Running an event
- 1Create a competition with its name, location, and dates.
- 2Open the event to record the amount you paid the organizer and to add entries for each dancer and category.
- 3As families pay you back, mark each entry reimbursed — this sends them a receipt.
- 4Watch the event's four totals — fronted, billed, recovered, and outstanding — to know exactly where you stand.
Note. Adding, editing, and deleting competitions is admin-only, and an event with reimbursed entries warns you before deletion so you do not lose financial history.
Reach families
Parent communication
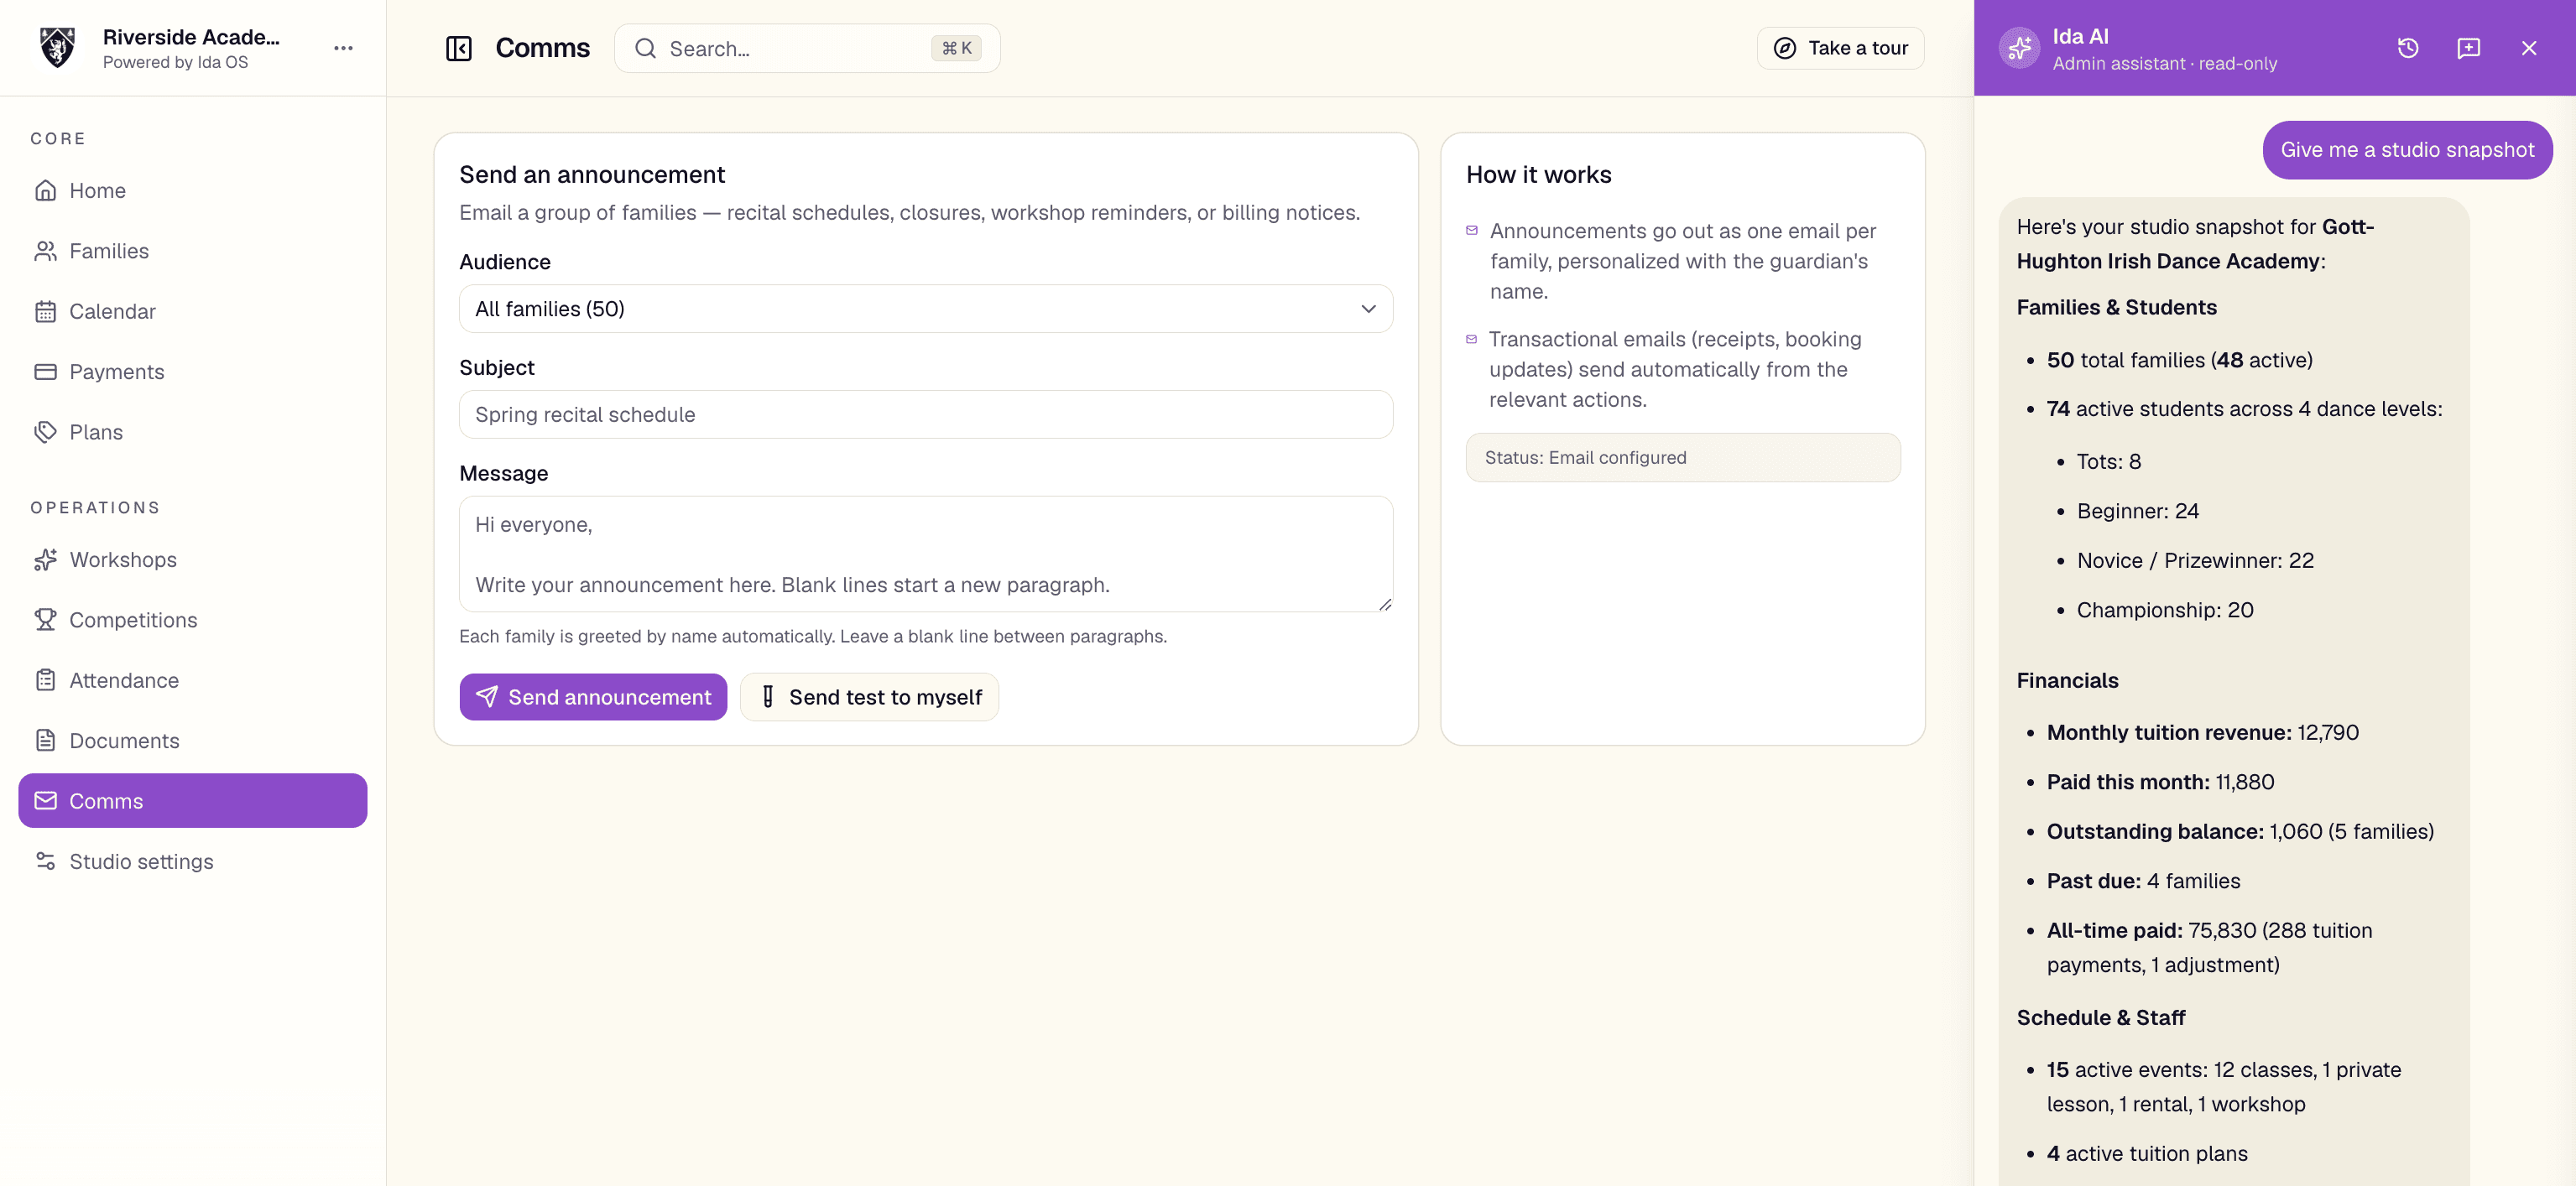
/dashboard/commsComms lets you email the right families at once instead of managing dozens of individual threads. You pick an audience, write one message, and Ida OS sends a personalized email to each family, greeting them by name.
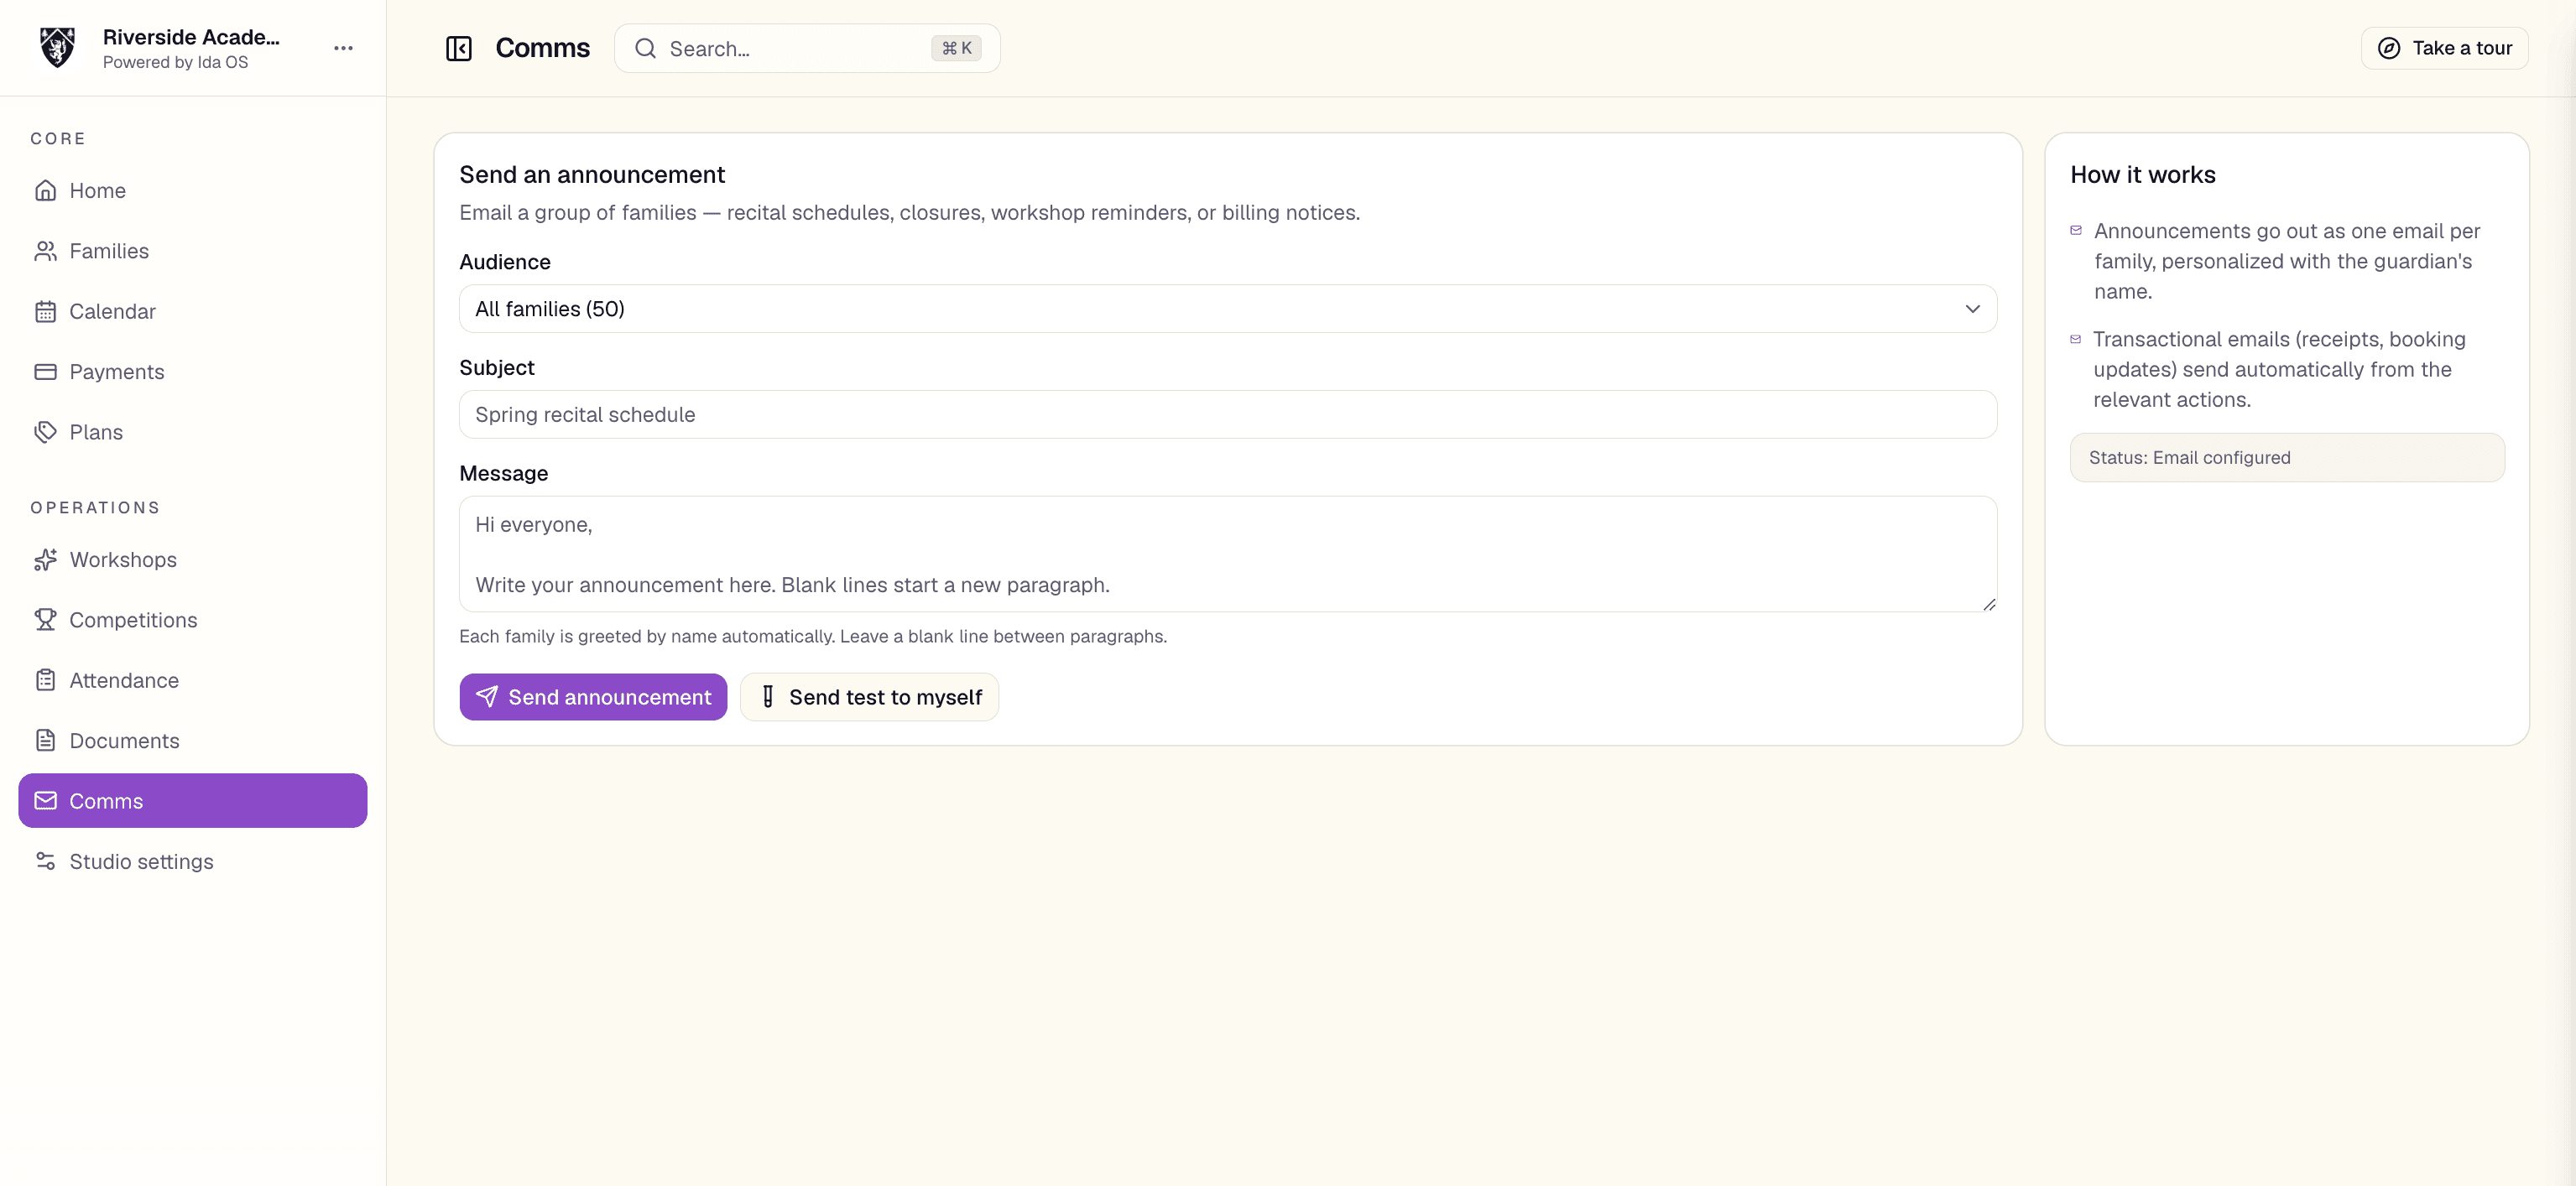
Sending an announcement
- 1Open Comms and choose your audience: all families, active billing, past due, manual billing, paused, or a hand-picked set of families.
- 2Write a subject and your message.
- 3Send a test to yourself first to check how it reads.
- 4Send. Each family receives its own personalized copy.
Note. Sending requires email (Resend) to be configured for your studio. Transactional emails — receipts, booking updates, invitations, and (when enabled) a New payment alert to your admins — go out automatically regardless.
Ida AI assistant
Ida is the built-in AI assistant, available to anyone attached to a studio. It answers questions grounded in your studio's own documents and records, so the answers reflect how your studio actually works — not generic advice.
For staff
Staff get the full assistant, which can draw on your records and the documents you have uploaded to help answer day-to-day questions.
Configuration
Studio settings
/dashboard/settingsStudio settings is where you shape how Ida OS looks and behaves for your school — your identity, your branding, your team, and the rules for payments and booking. It is organized into tabs — Studio, Branding, Team, Payments, and Notifications — and is worth a pass when you first set up, with the occasional revisit as your studio changes.
Studio details
On the Studio tab, set your studio name, email, phone, and address. These appear across the app and on every email your families receive.
Branding
The Branding tab is where you make Ida OS your own: upload a logo, pick a theme and primary color, and customize your calendar colors. A live preview shows the real branded invitation email families will receive, so you can see your branding in context before anyone else does.
Calendar colors
Also on Branding, you can recolor the calendar. Set a color for each event type (class, practice, private lesson, rental, workshop, blackout) and for each class level (tots, beginner, novice/prizewinner, championship). A class tagged with a level uses its level color; everything else uses its type color. Reload the calendar after saving to see the change, and use 'Reset to defaults' to start over.
Your team
The Team tab manages the instructors who can teach and help run the studio. Instructors get access to the roster and schedule without the admin-only financial and destructive actions.
Payments and booking rules
On the Payments tab, connect Stripe to receive payouts — the page shows whether charges and payouts are enabled. Then decide how member booking should work: instant 'pay and book', or staff approval first. You can also set the hourly rate for non-student studio rentals and choose whether members see which instructor is assigned to a class.
This tab also holds your tuition billing date: choose a fixed day of the month to bill recurring tuition, or leave it on each family's own signup day. It applies to new autopay sign-ups only.
Note. Practice and private-lesson rates shown here are read-only summaries; you edit them on the relevant plan or calendar event rather than in settings.
Notifications
The Notifications tab controls which alerts your team receives by email. Payment alerts — a 'New payment received' summary sent to every admin whenever a payment lands, online via Stripe or recorded manually — are on by default and can be turned off here.
Ready to see it on your studio?
Book a walkthrough and we'll set up your families, calendar, and tuition together.