
Browse all sections
Students & families
/dashboard/familiesStudents and Families is your roster — the single source of truth for every household and dancer in the studio. Staff manage the whole roster here; families use the same area as their profile to keep their own details current.
Browsing the roster
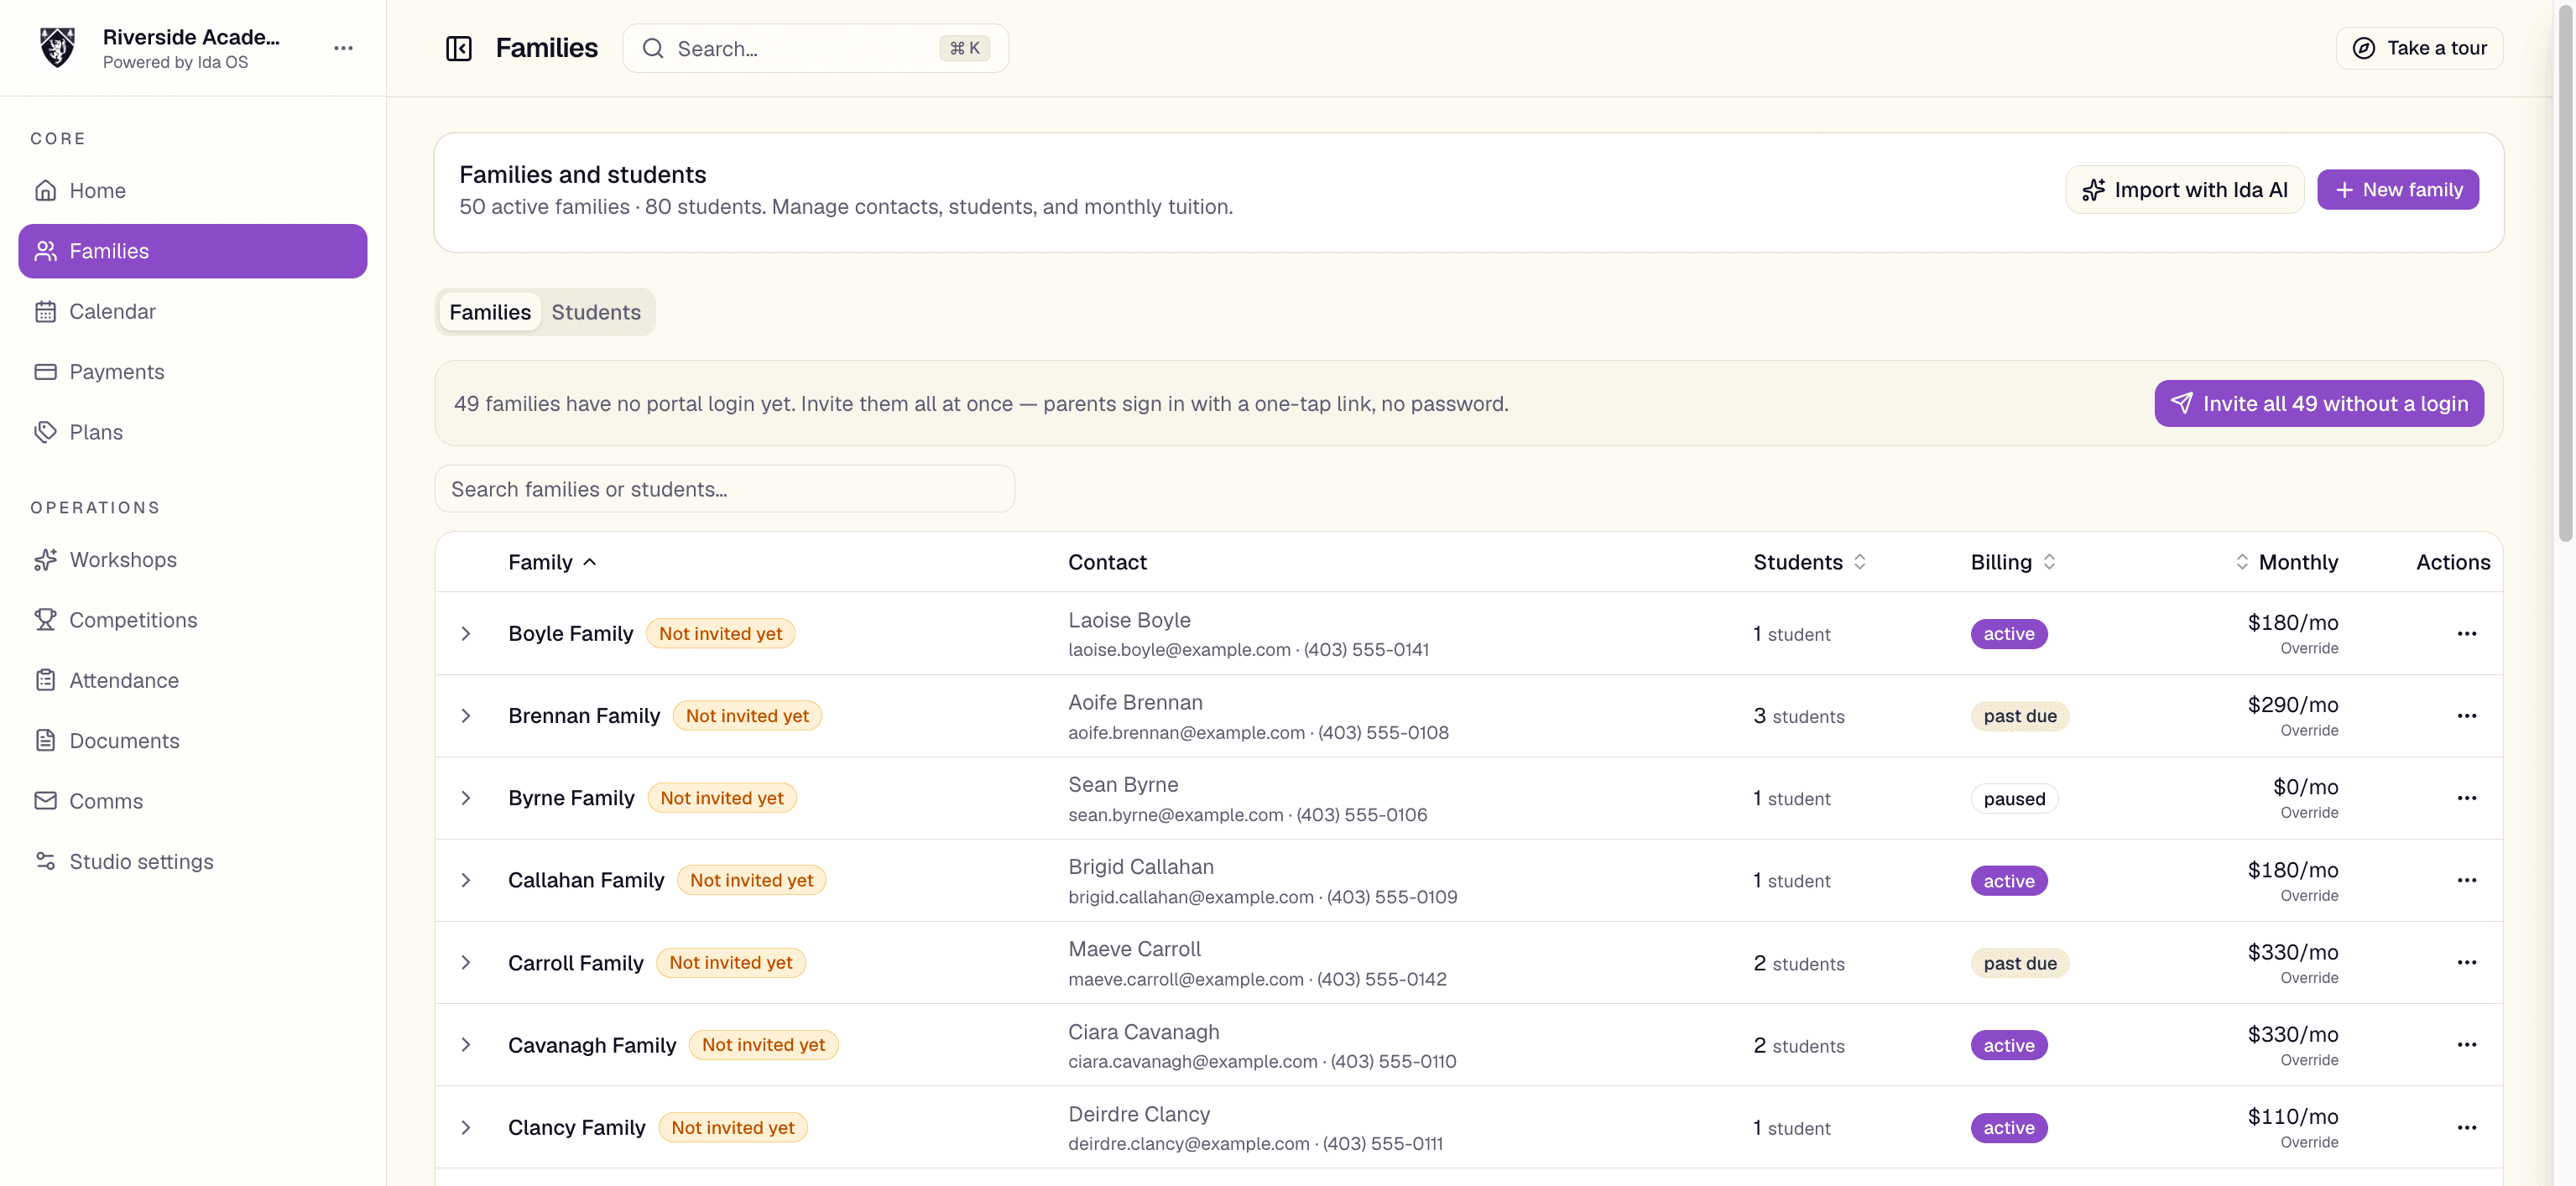
The roster is one table with two views — Families and Students — flipped with the switch above it. The Families view lists households: a Primary contact column shows that person's name, email, and phone — expand any family to see the rest of the household, the emergency contact, and the students attached to it. Each household's row leads with its photo — the picture the family adds from their portal Profile — or its initials on a colored circle until one is added, and the same photo follows the family into the search results and the Manage family dialog. An Account column shows whether they can sign in — Has 1 login or Has 2 logins once portal logins exist, Not invited until then — and, when your studio charges a registration fee, a Registration column shows Paid, Due, or Waived for each family. Families still on a trial wear a Trial badge on their name. The Students view lists every dancer across the studio with their family, weekly classes, level, status, and attendance — and wherever a level appears on the roster, in the Students view or beside a dancer inside an expanded family, it shows as a chip in that level's calendar color, so the roster reads in the same colors as your schedule. In the Students view every dancer's name is also a link to their household: point at it and it underlines, click it and Manage family opens already on its Students tab — so a dancer you found by search is one click from their family's contacts, billing, and payments.
The roster also shows each dancer's weekly classes — the recurring classes on your calendar they are enrolled in. The Students view carries a Classes column, and inside an expanded family each dancer's classes appear under their name; the same list shows under each dancer on the Students tab of Manage family. Each class sits on its own line, and each carries the weekly day and start time it meets. In the roster lists — the Students view and inside an expanded family — just the name shows, so rows stay easy to scan: point at a class name (or click it, or tap it in the iPhone app) and its day and time appear, like 'Tue 6:00 PM'. On the Students tab of Manage family the schedule is written out beside the name instead — 'Ballet · Tue 6:00 PM' — so when two classes share a name you always know which one a dancer is in, and weekly practices carry their day and time the same way in both places, on the web and in the iPhone app alike. Every class a dancer is on is included, however many they take: classes with an upcoming session appear, a class a family has joined shows even before its next dates land on the calendar, and classes that have ended drop off on their own. A dancer on a trial shows the class they booked here too — and when their trial covers more than one class, the count follows on its own line (say, '8 classes'), so a dancer trying a whole series or on a class pass never reads like a single-night drop-in. The trial class holds their booked dates, too: it wears a dotted underline, and the same point, click, or tap that shows a class's day and time also lists the dates and times that dancer is booked in for — each with its weekday — in your studio's timezone — wherever the name appears, in the Students view, inside an expanded family, and on the Students tab of Manage family. Only classes actually booked are listed, including dates already past in a trial still under way — never every future date of a recurring class — so you can tell when a trial dancer is coming in without opening the class. The list is purely informational — it never changes what a family is billed; to change which classes a dancer takes, edit the dancer (see 'Changing a dancer's weekly classes' below).
Weekly practices show up the same way, kept apart from classes so the two never blur. At studios that run weekly practices, the Students view adds a Practices column listing the practices each dancer attends every week — through a weekly Join or a spot on the practice's roster — and inside an expanded family (and on the Students tab of Manage family) those names appear on their own Practice line under the dancer. Current and upcoming practices show, ended ones drop off on their own, and like the class list it is display only: practice names never mix into a dancer's classes or change what a family is billed. Studios without weekly practices simply never see the column.
Both views are searchable and sortable, and filters narrow the list to exactly who you are looking for. Search, the Families / Students switch, Filters, Export, Send Sign-up link, and Add New Family sit on one row above the table. How names alphabetize is yours to choose: the Families view starts in last-name order — households are filed by the primary contact's surname, so 'The Jane Doe family' sits under D — while the Students view starts on first names. Clicking the Family or Student column heading cycles through the orders — A–Z, then Z–A, then the same two by the other name — and pointing at the heading names the order the list is in, like 'Last name, A–Z'; the Students view's Family column follows the same choice. The order you pick stays with you as you flip between the two views, and it is kept in the page's web address so a sorted list survives a refresh and can be shared. Search matches class and practice names as well as people, so typing a class's name pulls up every dancer enrolled in it. In the Families view, one Filters menu nests Autopay, Account, Membership, and Registration (when your studio charges a fee) — plus home location at multi-location studios. Hover a row to pick On, Has login, Trial, and so on; the button counts how many are applied. In the Students view, Filters nests status and level, and sorting the list by level follows the order of your studio's levels rather than the alphabet. The Students view's filters are kept in the page's web address, so a filtered list survives a refresh and can be bookmarked or shared with a colleague — and clicking a level on the dashboard's 'Students by level' chart brings you here the same way, with that level's active dancers already showing. 'Show archived' brings archived families back into view, and Clear filters resets the menu. A count row stays pinned to the bottom of the table: in the Families view, how many families match your filters and how many students they hold — plus this month's tuition for those households, so a filtered list has its own run-rate. Households billed quarterly, every 6 months, or yearly are folded into that monthly total. In the Students view, the same row counts how many dancers are showing and how many families they span. Narrow the list and the numbers follow — so a search for one class doubles as a quick head-count — and with nothing applied it reads as your full active roster.
Exporting the roster
Web dashboardWhen you need the roster outside of Ida — class lists for the front desk, a printed sign-in sheet, or a spreadsheet to work in — use the Export button at the top of Students and Families. It builds a file from the same roster you are looking at, either as a spreadsheet (CSV that opens in Excel or Google Sheets) or as a print-ready roster you can save or print as a PDF.
You choose how the file is laid out. 'By class' lists who is in each weekly class, one group per class — a dancer taking three classes appears under all three, and dancers with no weekly class gather at the end under 'No weekly class'. A Class picker sits below the choice: leave it on All classes, or pick a single class to export just that group — handy for a costume list or a recital sheet. At studios that run weekly practices, 'By practice' does the same for practice groups: one section per weekly practice, a Practice picker for every practice or just one, and dancers with no weekly practice gather under 'No weekly practice'. Studios without weekly practices never see that layout. In the printable version, a 'New page for each class' or 'New page for each practice' switch (shown once you have picked the printable file and a grouped layout) decides how groups flow: leave it on and each class or practice starts on its own page, ready to hand out or pin up as-is — turn it off to pack the groups together onto fewer pages. 'By student' gives one row per dancer instead. You also choose who is included — the current roster (active and trial dancers) or everyone including inactive dancers, with archived families off unless you switch them on — and which columns come along: family, level, birthdate (as YYYY-MM-DD, for competition entries), status, classes, and the family's primary contact, email, and phone. At studios with weekly practices there is a Practices column too, already ticked for you, with each dancer's practice names kept separate from their classes — studios without practices never see it.
- 1On Students and Families, choose Export.
- 2Pick the file (spreadsheet or printable PDF), the layout (by class, by practice when your studio runs weekly practices, or by student — and for a grouped layout, all of them or just one), and who is included. For a printable grouped roster, choose whether each class or practice starts a new page.
- 3Toggle the columns you want — the footer counts what the export will contain as you adjust.
- 4Choose Download CSV, or Open PDF to get a print-ready roster in a new tab with the print dialog ready.
Note. The export lists the same weekly classes and practices as the roster and Manage family — it is a snapshot for sharing and printing, and nothing in it changes what anyone is billed.
Exporting the roster from the app
iPhone appThe same export travels with you: on the Families tab, tap the share button next to search. The sheet offers the same choices as the web — spreadsheet or printable, by class, by practice when your studio runs weekly practices, or by student, all classes or practices or just one, whether each group in the printable starts a new page, current roster or everyone, archived families, and which columns to include — and hands the finished file to your phone's share sheet, so you can AirDrop it to the front-desk computer, text it, email it, or save and print it from there.
Adding families and students
Admins and front desk staff can create a family by hand, and admins can also import many families at once. (Ida AI can do both for you as well — ask it to add a household, or hand it a roster right in the chat; see the Ida AI assistant section.) Invites happen per person: open Manage family → Details and choose Give login from a contact's ⋯ menu — create their setup link, then copy it, share on WhatsApp or text, or email it with a button that names exactly who will receive it. Creating the link never sends anything by itself, and a household with two parents can have a login for each. (There is a third way, too: share your studio's family sign-up link and let households create their own accounts — see below.)
A new family's billing status starts as Manual (e-transfer / cheque) — nothing is billed automatically until the family sets up autopay themselves. You can instead mark them Past due or Paused as you create them; Active (Stripe autopay) is not offered here, because it switches on by itself once the family completes card setup.
- 1In the Families view, choose Create family (or Import to bring in a list).
- 2Fill in the family name and contacts, plus the household's home address when you have it. The address and emergency contact are both optional here — add either whenever you like, now or later from Manage family → Details.
- 3Open the family and use Add student to attach each dancer with their name, birthdate, an optional gender (Female, Male, Non-binary, or Prefer not to say — it can always stay unset), level, anything medical worth knowing — allergies, conditions, accessibility, in the same field families fill in when they register — and your own staff notes, kept in a separate field of their own.
- 4When you are ready, invite each parent from their contact on Manage family → Details: choose Give login from the contact's ⋯ menu, create the setup link, then copy it, share on WhatsApp, or email it — creating the link never sends anything by itself.
Note. Instructors can see the full roster but do not get the create, edit, invite, or delete actions. Front desk staff can create and edit families and students, keep contacts current, and invite families to the portal — importing a roster, archiving, and deleting stay with admins.
Let families sign up themselves
Web dashboardYou do not have to invite every household one by one. Your studio also has a family sign-up link — a page in your studio's branding where a family creates its own portal account with just a name, an email, and a password, then continues to Registration. Share it however suits you: in a welcome email, a WhatsApp group, a newsletter, or a poster at the front desk. Owners and front desk staff can both share it from the Sign-up link button on Students and Families; turning it on or off stays with owners.
A family that signs up this way appears on your roster right away as a household with no dancers yet, with billing set to Manual — so nothing is billed until you add their students and set their levels. If the email matches a family already on your roster that has no portal account, the sign-up connects to that existing family instead of creating a duplicate. A household that already has a login cannot be joined from the public page, though — when a second parent wants their own sign-in, give them one from their contact on Manage family → Details instead.
- 1On Settings → Branding, find the Family sign-up link card (self-signup is on by default — turn it off if you prefer invite-only).
- 2Optional: turn on Registration form on the sign-up link if you want families to create their account and complete your registration form in one step on that public page, then go to the calendar. You can flip that from Sign-up link on Students and Families (there’s a live preview) or from Settings → Branding. This only takes effect while the registration form itself is on. What the one-step page asks follows your registration type: Full form collects the family's details, dancers, and policy sign-offs before payment, while Fee only goes straight from creating the account to accepting your policies and paying the fee — a brand-new family finishes without entering any dancer details, and you add their dancers afterwards.
- 3Copy or WhatsApp the link from Settings, or from Sign-up link on Students and Families.
- 4Families open the link and either complete everything on that page (account plus registration, then the calendar), or create an account and then finish Registration in the portal — depending on that setting.
Note. The link is on by default; only admins can turn it off. While it is off, visitors see a 'sign-up unavailable' page instead of the form. A family that already has an account with your studio can use the page too: entering their usual email and password signs them in and carries them on like anyone else — handy when someone forgets they registered before. With the wrong password they are asked to sign in instead, an email that belongs to a family at another studio cannot be used here, and a teacher's email is pointed to signing in with the login they already have, with a note to ask the studio to add their child through Also book as student. An existing account can never be taken over from the public page — continuing always takes the account's own password.
A family's login email
The email on a contact is the address they type on the sign-in page. Open Manage family → Details and expand that person's card — change Email there to fix a typo or follow a parent to a new address. On the phone, tap the contact on Details. Saving writes the same email onto their login. Their password stays as it is. If they forgot the password, choose Reset password in the contact's ⋯ menu and hand them the details.
A family invited by link without an email on file can use that link to get in, but has no email login yet. Add their address on the contact and save — from then on they sign in with that email, and it is the username if you set them a password.
Note. An address already used by another account cannot become a family's login email — Ida asks you to pick a different one.
Who in a household can pay
A household with two parents can have a login for each — and some families want only one of them handling the money. Every login carries a Can pay flag, on by default: expand the contact's card on Manage family → Details (or tap the contact in the family's record in the iPhone app) and untick Can pay to take the money actions away from that login, or tick it to hand them back. You can also set it as you give a contact their login, so a second parent can start out view-only from day one.
A login that cannot pay still sees the household's full Payments page — the balance, every charge, the history, and receipts — but the paying itself belongs to someone else: no Pay now on charges, no starting or changing autopay, no billing-day pick, no card changes or billing portal, and no booking auto-charge switch. In their place, a short note says another parent on the household manages the card and payments. Your side is untouched — you can still charge the family's saved card or record payments as usual, and staff using View as family can always act on the household's behalf.
Registration follows the same rule when there is something to pay: a registration with a fee — or required shop add-ons — asks the parent who pays to complete it, and a login that cannot pay is told exactly that rather than being taken to checkout. A registration with nothing to pay can be submitted from any login.
Note. Can pay is not the same as Primary contact or Receives billing — those only decide who the studio emails. This flag alone decides who can move money.
Managing a family
Everything about a household is edited in one place: open the family's actions menu and choose Manage family. Rename the household from the pencil next to its name in the dialog header. The dialog has four tabs — Details for contacts (including each parent's portal login), the family's home address, emergency contact, notes, and (for studios with more than one location) a home location; Students for adding and editing the family's dancers; Billing for tuition, billing status, and the registration fee; and Payments for that family's outstanding charges and past payments, with the same mark-paid, void, refund, and create-a-payment actions as the studio ledger — plus a Charge button that collects the family's outstanding charges on their saved card, greyed out until they have one on file. Each contact on Details is its own card, with a chip showing where their portal login stands; expand the card to edit their name, email, phone, and preferences. The card's ⋯ menu holds the login itself: Give login to invite them, or — once they have one — Reset password or Remove login (you confirm first) without deleting the contact. Removing the contact itself also deletes their family portal login, after a confirmation, and anything they wrote in Messages stays in the thread under their name; a teacher who also books as a student keeps their studio login. Their email on that contact is how they sign in. Each tab saves on its own, so fixing a phone number never touches the money. Front desk staff work from this same dialog: Details, Students, and taking a payment on the Payments tab are theirs to use, they can send or record the registration fee, and they can mark a family Trialing or a Full member from the Trial status setting on Details — while plan and billing changes, waiving fees, and voiding or refunding stay with admins.
Details is also where a family's registration lives on. The home address fields hold the address the family gave on your registration form — and they are yours to fill in or correct by hand, so a household that moves, or one you added yourself, always has a current address on file (it also matters for tax on studio charges). Below the details, a Registration section replays each confirmed registration exactly as the family submitted it: the period, when it was submitted and where the fee stands, the family's answers to your questions, each dancer's details — class or level, tuition plan, birth date, medical notes — any shop add-ons they bought, and the policies they accepted, each with a tick. It is the same recap the family sees on their own Registration page after they register, so 'what did we put on the form?' is answered without leaving the family — and while the recap keeps what was submitted at the time, the address at the top stays current if they move.
Open any family from anywhere
Web dashboardYou do not have to be on the roster to open a family. From any dashboard page, click the Search box at the top — or press ⌘K (Ctrl+K on Windows) — and start typing a family name, a guardian's name, an email address, or a dancer's name. Matching families appear as you type; choose one and Manage family opens right where you are, with the same tabs as always, so you can check a phone number or a balance mid-task and close the dialog without losing your place.
Note. Search covers your active families — archived families do not appear in the results. Use the roster's 'Show archived' filter to find those.
See the portal as a family sees it
When a parent calls about something on their screen, the quickest answer is to look at exactly what they see. Owners and front desk can step into the portal of any family that has a portal account: choose 'View as family' from the family's row menu on the roster, or the 'View as' button at the top of Manage family. The dashboard switches to that family's own view — their home page, schedule, payments, documents, and notifications, exactly as they see them — with a banner across the top reminding you whose view you are in. Choose 'Exit family view' in the banner to return to your roster.
Heads up. Viewing as a family is not a preview on a copy — anything you do there acts on the family's real account, just as if they had done it themselves. Browse freely, but only take an action, like paying a charge or editing a detail, when you mean to do it on the family's behalf.
Viewing as a family in the app
iPhone appThe iPhone app does the same on the go: on the Families tab, touch and hold the card of a family with a portal account and choose 'View as family', or pick the same action from inside their family record. The app flips to that family's member experience with the same banner along the top; tap Switch to staff in the banner to come back to your Families tab.
How tuition is set
Tuition is driven by each student's plan, not a single number on the family. By default a student's level chooses their plan: set their level (one of the dance levels your studio defines on the Branding tab) and they bill on that level's plan, with its own price and billing interval (monthly, quarterly, every 6 months, or yearly). A family's tuition is simply the sum of its active students' plan prices, so a household with two dancers at different levels bills the combined total automatically.
You change what a family pays on each student's record (open a family and edit or add a student), not by typing a family-wide amount. Usually that means setting the student's level — they bill on that level's plan. When a level has more than one plan, or a dancer needs a specific package, use the student form's Tuition plan field to put them on an exact plan instead: the dancer then bills that plan, and their level follows the plan automatically. The field also says plainly what happens when you don't pick a plan: at studios with a default plan (see 'Default on registration' on Tuition plans) that choice is named 'Studio default' with the plan's name, and an unpinned dancer bills the default — the default plan is also marked '(default)' in the list; at studios without one it reads 'None — bill by dance level' and clearing the field returns the dancer to their level's pricing. Either way, a note under the field spells out which plan the dancer will actually bill, including when a plan you pick overrides the studio default. If your studio marks some plans as add-ons, the same form also lists them under 'Additional classes' — tick the extras a dancer takes and each is billed on top of their main plan (see Tuition plans in this guide). On the roster, the tuition column shows each family's amount with how often it bills (like /mo or /quarter); a family whose students sit on plans with different billing intervals is marked 'Mixed intervals', and a family on a seasonal break (a $0 month) shows a small 'Resumes' note with the month tuition picks back up and the amount — so a paused family never looks like one with no tuition set.
Tip. A student with no level/plan, or a family whose students have no priced plans, needs a level set before autopay can start from their Payments page. Autopay needs one billing interval per family: if a family's students are on plans that bill on different intervals, the Billing tab warns you and autopay stays unavailable until they share one.
Changing a dancer's weekly classes
At studios where families join weekly classes from the calendar, staff can change what a dancer takes without opening each class one by one: edit the dancer — Manage family → Students on the web, or tap them in their family record in the iPhone app — and Edit student carries a Classes panel beside their details. A 'Now' line sums up what they take today, and under it every weekly class and practice the dancer could be in appears as a checklist, searchable by name, with practices kept apart from classes. Every entry is labeled with the day and time it meets each week — 'Level 3 · Tue 6:00 PM', with each slot listed when it meets more than once a week — so two classes that share a name are never mistaken for each other. Tick what they should be taking and untick what they are leaving — a class that is full or has no upcoming dates says so and stays unticked, and a join the family already has awaiting approval shows 'Request pending'.
Nothing changes until you press Confirm class changes — and before you do, the panel prices the change: what class tuition becomes per month, with a line-by-line breakdown, and when the change lands partway through a billing month, this month's reduced amount alongside the regular amount that follows, like 'September 2026 is $52.50, then $70/mo.' — the same math as a family's own mid-month Join. Practices never change class tuition, and the panel says so when practices are all you changed. Confirm, and everything takes effect the same day: the dancer is on the ticked classes and off the unticked ones from today, and the family's tuition — including an open tuition bill for the month — follows on its own.
Note. The checklist is there for staff who can edit families — admins and front desk. At studios that don't use calendar Join for weekly classes, the panel says classes can only change from the calendar, where each class's roster is managed with Manage roster.
Family-level tuition overrides
When a household needs something different from the per-student sum — a discount, a flat family rate, or a custom seasonal schedule — open Manage family and set a tuition override on the Billing tab. An override replaces the summed student plans for that family rather than layering on top of them, and it keeps their live Stripe subscription in step automatically. If their autopay can't be brought in line for any reason, the save still goes through and says so plainly — 'Monthly tuition was saved, but Stripe autopay was not updated' — so you can review the family's autopay before their next charge instead of finding out on billing day.
What billing status really means
The Billing tab opens with a plain sentence describing what a family's billing actually is right now — on autopay, paying each charge themselves, paused, or flagged past due — so the label never hides the reality underneath. Two statuses are kept truthful automatically and are never yours to set by hand: a family becomes Active only by completing autopay card setup, and flips to Manual when their autopay is cancelled.
The statuses you can set do real work. Past due flags a family on your roster. Paused genuinely stops collection: for a family on autopay, choosing Paused pauses their Stripe subscription (the save confirms it) and it stays paused until you set them back to Active, which resumes billing at the scheduled amount. The same rules apply in the iPhone app, so a status set from your phone means exactly the same thing.
Sometimes one card charge should be skipped without letting the month off the hook — a family has arranged to pay it themselves, say. Pausing is too blunt for that: it stops everything, late fees included. Instead, the Billing tab of a family on autopay carries a 'Skip card charges due before' date. Set it, and tuition due before that day is not collected on their card, but the family stays Active — if your studio charges late fees, they still count — and the skipped month's tuition becomes a normal open charge: the family sees Pay now, and you can Mark paid or Charge card like any other charge. Autopay resumes with the first cycle on or after the date, all on its own. Keep the date in place after the family pays — clearing it early can hand the skipped month back to their card — and leave the field blank for normal autopay. The same date field sits on the family's record in the iPhone app.
The roster's Autopay column reads richer than those settings, because it shows what collection is actually doing: On (a family on a seasonal $0 month reads 'On · seasonal pause'), Blocked when Stripe cannot determine the family's tax location — the next charge will not collect until they add their address from Manage autopay — Past due, Ending when autopay is scheduled to cancel but still collects until that date, Off, Paused, and Held while a 'Skip card charges due before' date is in force. Hover a status for the plain-language explanation, and the Autopay filter picks out any of them — Blocked, Ending, and Held included. The app's Families tab shows and filters the same statuses, with the explanation written out on families that need attention.
Collecting the registration fee
If your studio charges a registration fee, Ida OS tracks it per family. Turn it on and set the default amount on Registration → Settings ('Charge a registration fee'), or under Settings → Payments & Bookings; each family then carries a clear status — due, paid, or waived — and nothing is ever billed automatically. With the registration form enabled, families can pay the fee themselves from their portal, and if your registration renews each year or by term, the status resets each period so returning families are asked again — see the Registration page of this guide.
To collect by hand, open Manage family and use the Registration section of the Billing tab: create a secure Stripe payment link, record the fee as paid outside Stripe (cash, e-transfer), or waive it. Creating a link never emails anyone by itself — the link appears first, and you then choose whether to copy it (to share by text or WhatsApp) or email it, with the button naming exactly who will receive it. A family that should pay a different amount can carry its own override of the studio-wide fee — the override wins everywhere, including the family's own portal checkout.
Note. Paid registration fees land in the payments ledger like any other payment. Staff can send registration links and record payments from the mobile app too.
Archiving vs. deleting
When a family or student leaves, prefer Archive (for families) or Mark inactive (for students). This keeps their history and stops billing without erasing anything. Permanent deletion is available but deliberately blocked when there is payment or booking history — Ida OS will tell you to archive instead so your books stay intact. Deleting a family also deletes their portal logins, so that email can sign up again; a teacher who also books as a student keeps their studio login. Your conversations are not rewritten by a deleted login: messages that person sent stay in Messages under their name (an older message with no name on record shows as 'Former contact').
Heads up. Permanent deletion cannot be undone — the household and its portal logins are both removed. A family with payment history, or a family or student with booking or workshop registration history, must be archived rather than deleted.
On the iPhone app
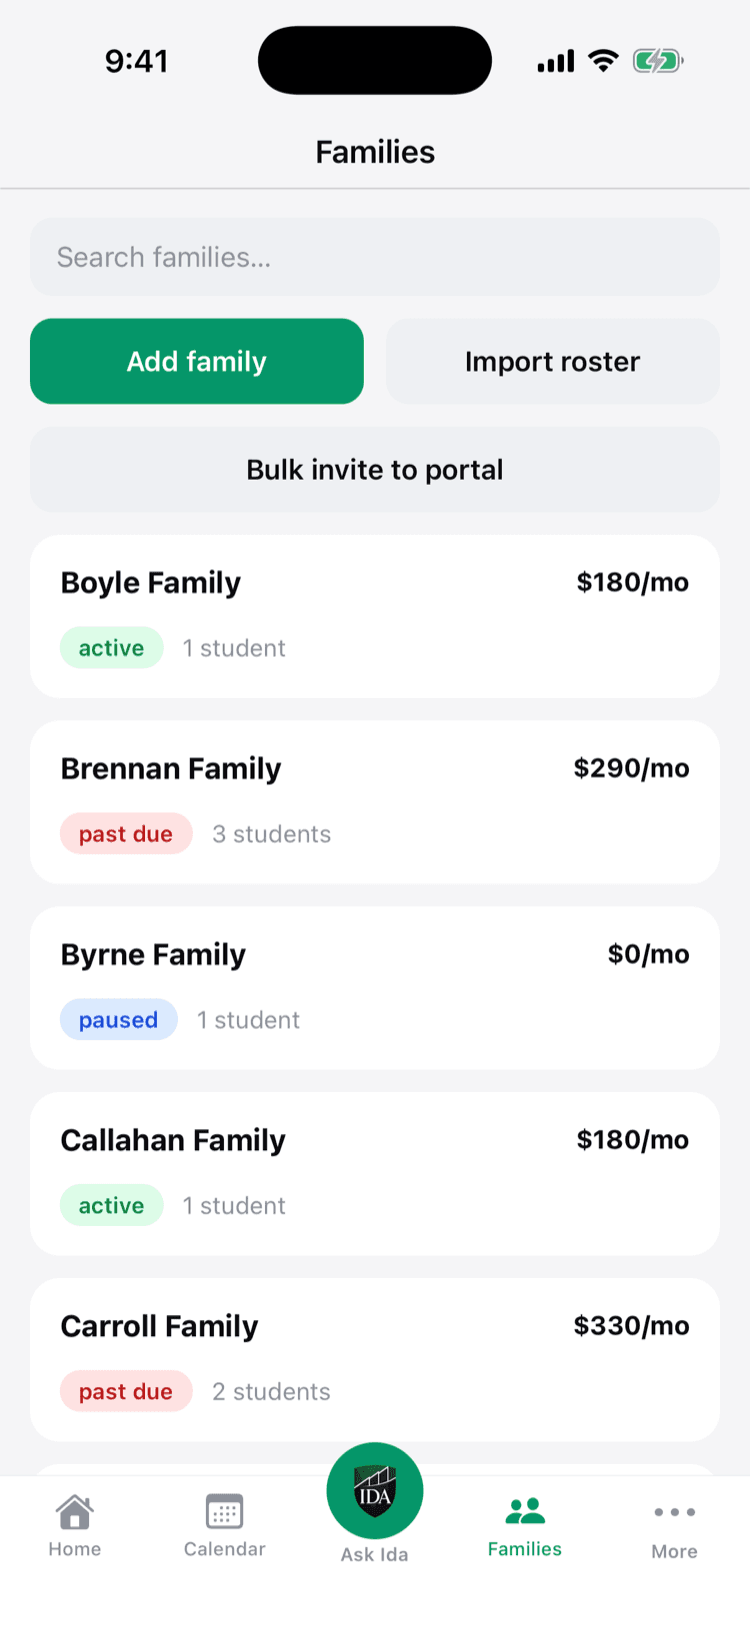
iPhone appThe Families tab carries the roster with you: search by the family's name, any of its students' names, or a class or practice name, and each card lists the household's dancers. A First name / Last name button beside search chooses how the lists alphabetize — families start filed by the primary contact's last name ('The Jane Doe family' under D) and dancers by first name, and one tap flips to the other order, with the A–Z section index regrouping to match. The Students view shows each dancer's weekly classes under their name, one per line — tap a class and the day and time it meets each week appear, and for a trial dancer the same tap lists the dates and times they are booked in for, in your studio's timezone — with any weekly practices on their own Practice line, kept apart from the classes, and with a trial covering more than one class carrying its count on its own line like the web. Open the family's record and the schedule is written out beside each name instead — 'Ballet · Tue 6:00 PM' — where tapping a trial class still shows its booked dates. Cards lead with each family's photo — or their initials on a colored circle until they add one — and the photo carries into the family's record when you open it. For admins and front desk, each card also shows the family's tuition total at a glance, labeled with how often it bills (like /mo or /quarter), and badges appear only when something needs you — past due, paused or held, a registration fee still owed, or a family not yet invited to the portal. The add button is there for admins and front desk alike: Add family creates a household on the spot, and Send Sign-up link — also for admins and front desk both — opens your studio's family sign-up link ready to send — the sheet shows whether self-sign-up is on, Preview opens the public page exactly as a family will see it, and Share hands the link to the iPhone's share sheet so you can text it, WhatsApp it, email it, or copy it from there. Owners can also flip Registration form on this link right in that sheet — account and registration in one step on the public page, then the calendar — while turning the link itself on or off stays with owners, in Settings → Branding on the web. (Importing a whole roster stays on the web dashboard — or hand a list to Ida AI right in the app's chat.) Opening a family shows the same panes as the web — Details and Students for everyone on staff, Payments for admins and front desk, and Billing for admins — with a summary bar that keeps the status and tuition amount in view. For admins and front desk, editing a dancer on Students carries the same Classes checklist as the web at studios that use calendar Join — change their weekly classes and practices, see the tuition preview, and confirm right from your phone. Portal logins live on each contact: tap a person on Details to invite them, or — if they already have a login — reset their password or remove it without deleting the contact, and the same Can pay switch as the web sits on each login, deciding whether that parent can pay for the household or only see Payments. Their email on that contact is how they sign in. The Details pane carries the household's registration record with it, too: their home address, and a card for each confirmed registration replaying what they submitted — when and where the fee stands, their answers, each dancer's details, and the policies they accepted. Edit details updates the address right from your phone, Add family asks for it as well, and a dancer's medical notes show under their name on Students, with the same separate Medical and Staff notes fields as the web when you edit them. Instructors see the roster without any of the money: the families, their dancers, and who still needs a portal invite, but no tuition amounts, billing status, or registration fees.